
Lesson 07: Create an ARM C Application with Keil μVision MDK-ARM
In This Lesson
In this lesson, you will create your first C application with the Keil µVision MDK-ARM development system and learn the basic project workflow — from creating a project all the way to downloading and debugging it on the TI Tiva LaunchPad.
After completing this lesson, you will be able to:
- Create and configure a new C project in Keil µVision.
- Set up the Stellaris ICDI interface for debugging and flash programming.
- Add MyDefines.h, main.c, and the ezTivaLIB library to your project.
- Build, download, run, and debug the application on the board.
Prerequisites
This lesson works with both the TI Tiva LaunchPad boards used in this course:
- EK-TM4C123GXL (TM4C123G)
- EK-TM4C1294XL (TM4C1294)
You must install Keil µVision MDK-ARM and the TI Tiva LaunchPad USB drivers before creating a project. If you have not done this yet, please complete Lesson 01: Installing Software and Drivers first.
Set Up the Project Folder Structure
Before creating the project, prepare a clean folder structure. On your Windows desktop, create a folder named EE3450, then add the sub-folders shown below:
EE3450/ (course root, on the Desktop) ├─ Common/ shared headers (e.g. MyDefines.h) ├─ ezTivaLIB/ the ezTiva library source ├─ Lab01/ one folder per lab / project ├─ Lab02/ └─ ... |
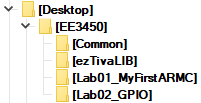 |
Keeping Common and ezTivaLIB outside the individual lab folders lets every lab share the same headers and library, rather than duplicating them in each project.
We do not recommend creating the workspace in the directories that are synced with OneDrive due to this known issue in OneDrive.
Steps in This Lesson
- Step 1 — Create a C/C++ Project
- Step 2 — Add MyDefines.h and the Common Folder
- Step 3 — Add ezTivaLIB
- Step 4 — (Optional) Use TivaWare Software/Library
- Step 5 — Set Up the Debug Method (choose Simulator or Target Debugging)
- Step 6 — Add main.c
- Step 7 — Build the Application
- Step 8 — Download and Run the Application
- Step 9 — Debug the Application
Note: Steps 1–5 and 7–9 are required for every lab project. Step 6 is optional and only needed if you plan to use TI's TivaWare driver library.
Step 1 — Create a C Project
Step 1 — Create a C Project
1.1 Startup Keil μVision 5
Launch Keil μVision 5 using either method:
- Double-click the Keil µVision5 icon (
 ) on your desktop, or
 - Open Start ➤ All Programs ➤
 Keil µVision5 from the Windows Start menu.
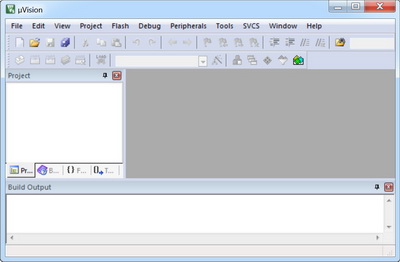
 - You will see the following screen.
1.2 Create a New Project
Before creating the project, create a new sub-folder under EE3450 for this project, using a numbered naming convention such as 01_MyFirstARMC. This keeps each lab/project organized in its own folder as the course progresses.
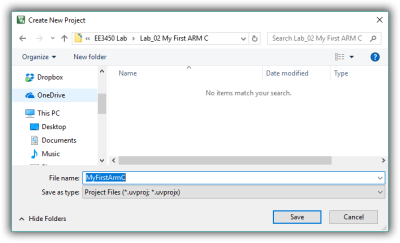
- In the main μVision menu, select Project ➤ New µVision Project. The Create New Project window opens.
- Browse to the EE3450 folder, create a new folder named 01_MyFirstARMC, then open it.
- Inside this folder, name the project file the same as the folder name — 01_MyFirstARMC — and click Save.
Tip: Keeping the project file name identical to its folder name makes it much easier to identify which project belongs to which folder later on.
1.3 Select the Target Device
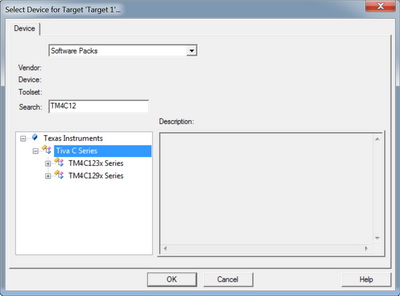
The Select Device for Target 'Target1' window opens next. Choose the device that matches your board:
| Your Board | Device path | Select |
| EK-TM4C123GXL | Texas Instruments ➤ Tiva C Series ➤ TM4C123x Series | TM4C123GH6PM |
| EK-TM4C1294XL | Texas Instruments ➤ Tiva C Series ➤ TM4C129x Series | TM4C1294NCPDT |
Click OK once you've selected the correct device.
1.4 Configure the Run-Time Environment
The Manage Run-Time Environment window opens automatically, showing the software components available for your device. Enable the following two components:
- CMSIS:CORE — defines the API for the Cortex-M processor core and peripherals.
- Device:Startup — provides system startup code and low-level device drivers. This component requires CMSIS:CORE to also be enabled.
Click OK to close the window.
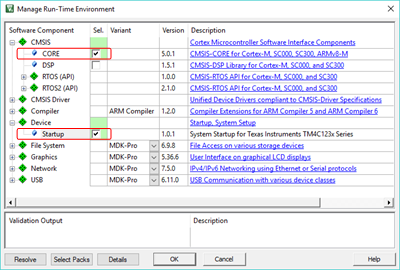
Result: Two files are automatically added to your project:
| File | Purpose |
| startup_<device>.s | Contains the reset handler and exception vectors (including stack and heap configuration) |
| system_<device>.c | Configuration file for basic device setup (clock and memory bus) |
Step 2 — Add MyDefines.h and the Common Folder
Step 2 — Add MyDefines.h and the Common Folder
2.1 Create MyDefines.h
This lesson assumes that MyDefines.h is already saved inside your Common folder from a previous lab.
If you do not already have this file, use Notepad++ (or any text editor) to create a new file named MyDefines.h, then follow Lesson KB 04 for the full file content and save it inside your Common folder.
2.2 Add the Common Folder to the Project's Include Paths
You do not need to add MyDefines.h itself to the project (it will be included via #include in your source code). Instead, just make sure the compiler knows where to find it:
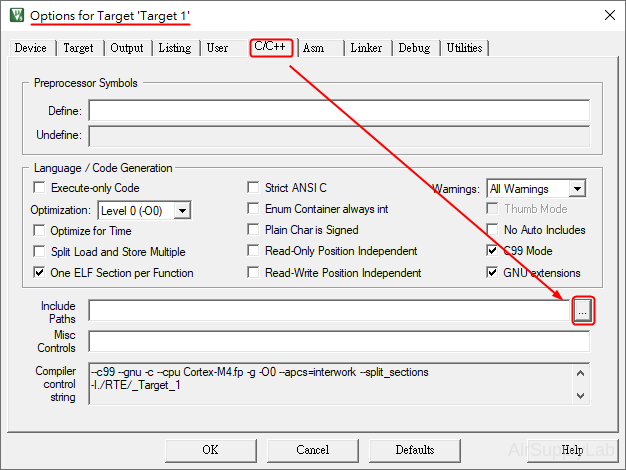
- Go to Project ➤ Options for Target ➤ C/C++ tab.
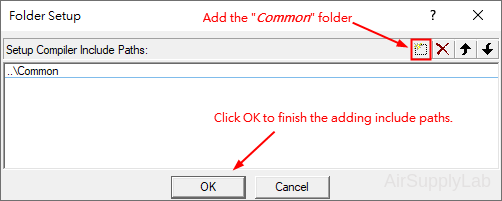
- Under Include Paths, click the browse button and add the path to your Common folder.
Step 3 — Add ezTivaLIB (Only If Your Project Uses It)
Step 3 — Add ezTivaLIB (Only If Your Project Uses It)
ezTivaLIB is a support library used in some labs of this course. It provides functions for configuring system clock frequency, controlling peripheral devices, and adding delays.
This step is only required if your project needs to use ezTivaLIB. If your project does not use it, skip this step.
If your project uses it, follow Lesson 08: Add ezTivaLIB to Your Project for the full setup, which includes downloading the library and understanding its folder structure.
As a quick reference, adding the library to your Include Paths works the same way as Step 2.2:
- Go to Project ➤ Options for Target ➤ C/C++ tab.
- Under Include Paths, add the path to your ezTivaLIB folder as an additional entry — alongside the Common folder path you already added in Step 3.
Note: Make sure the Common folder path from Step 3 is still present in the list. You are adding ezTivaLIB as an additional path, not replacing it.
Step 4 — (Optional) Use TivaWare Software/Library
Step 4 — (Optional) Use TivaWare Software/Library
📌 This step is OPTIONAL. TivaWare is a separate software library provided by TI. You only need to complete this step if your project specifically requires TivaWare. If not, skip directly to Step 7.
TivaWare is a software library that helps embedded developers simplify and speed up development. The complete TivaWare package includes:
- Royalty-free libraries (Peripheral, USB, Graphics, Sensor)
- Kit- and peripheral-specific code examples for TM4C123x devices
Using TivaWare with Keil requires a few extra configuration steps, described below.
4.1 Add the driverlib Library to Your Project
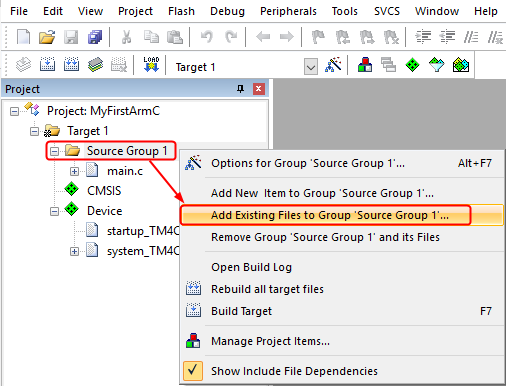
- In the Project window, right-click Source Group 1 and select Add Existing Files to Group 'Source Group 1'...
- In the dialog, change Files of type to Library files (*.lib) (or All files), then browse to: C:\ti\TivaWare_C_Series-2.1.4.178\driverlib\rvmdk
Select driverlib.lib, click Add, then Close.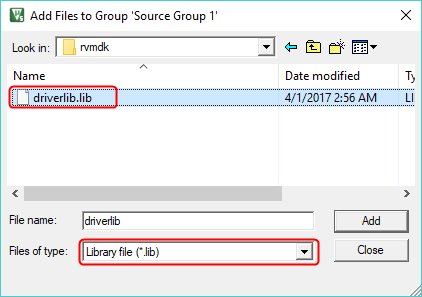
4.2 Configure Preprocessor Symbols
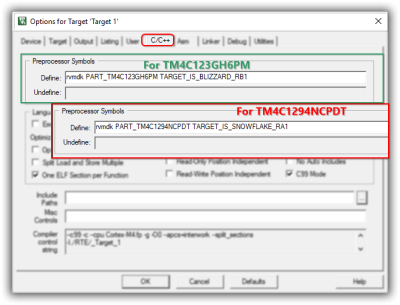
Go to Project ➤ Options for Target ➤ C/C++ tab, and under Preprocessor Symbols ➤ Define, add the symbols for your board
| Board | Symbols to Add |
|---|---|
| EK-TM4C123GXL | rvmdk PART_TM4C123GH6PM TARGET_IS_BLIZZARD_RB1 |
| EK-TM4C1294XL | rvmdk PART_TM4C1294NCPDT TARGET_IS_SNOWFLAKE_RA1 |
4.3 Configure Include Paths and Linker Settings
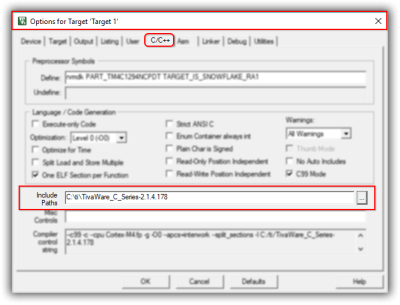
- Include Paths: In the same dialog, add the top-level TivaWare directory to your Include Paths: C:\ti\TivaWare_C_Series-2.1.4.178
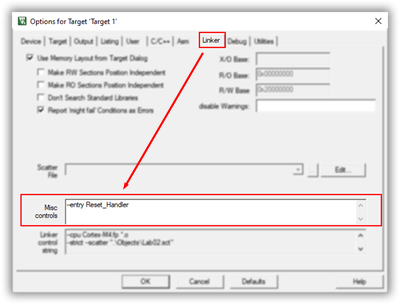
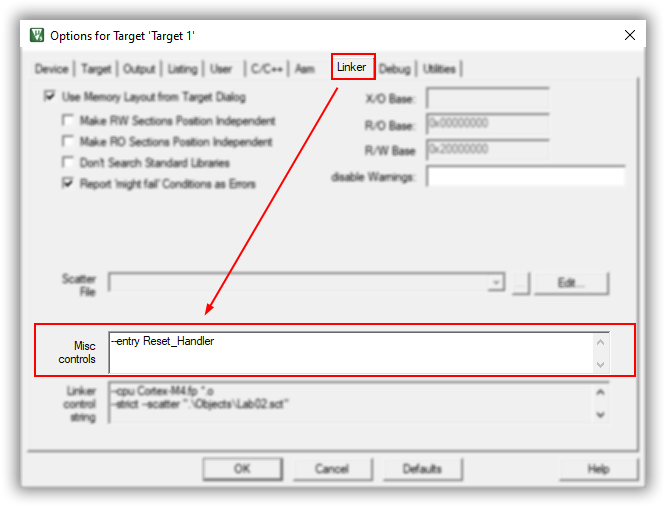
- Linker: Go to the Linker tab, and under Misc controls, add: --entry Reset_Handler
4.4 Template Code Using TivaWare
EK-TM4C123GXL LaunchPad
#include <stdio.h>
#include <stdlib.h>
#include <stdint.h>
#include <stdbool.h>

#include "inc/hw_memmap.h"
#include "inc/hw_types.h"
#include "driverlib/sysctl.h"


int main()
{
    // Place your initialization/startup code here (e.g. Setup_GPIO())
    SysCtlClockSet(SYSCTL_SYSDIV_5 | SYSCTL_USE_PLL | SYSCTL_XTAL_16MHZ | SYSCTL_OSC_MAIN);

    while(1) {
        // Place your application code here.

    }
}
EK-TM4C1294XL LaunchPad
#include <stdio.h>
#include <stdlib.h>
#include <stdint.h>
#include <stdbool.h>

#include "inc/hw_memmap.h"
#include "inc/hw_types.h"
#include "driverlib/sysctl.h"


int main()
{
    // Place your initialization/startup code here (e.g. Setup_GPIO())
    SysCtlClockFreqSet(SYSCTL_USE_PLL | SYSCTL_XTAL_25MHZ | SYSCTL_CFG_VCO_480 | SYSCTL_OSC_MAIN, 120000000);

    while(1) {
        // Place your application code here.

    }
}
Step 5 — Set Up the Debug Method
Step 5 — Set Up the Debug Method
Keil μVision supports two ways to debug your application: a software Simulator (no hardware needed) or Target Debugging on the actual Tiva LaunchPad board. Choose one of the two methods below based on your situation.
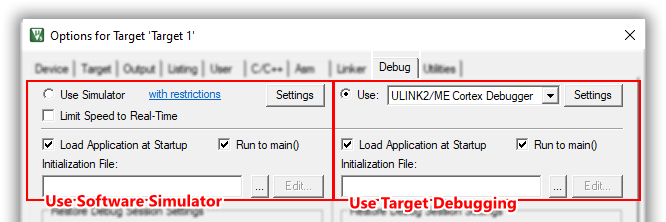
Required for Both Methods
Regardless of which method you choose, enable these two settings on the Debug tab:
- Load Application at Startup —automatically loads the application into the μVision debugger when a debugging session starts.
- Run to main() — automatically executes instructions up to the first line of main() when a debugging session starts.
Choose Your Debug Method
Use Simulator
Use Simulator
The Simulator configures µVision as a software-only debugger that simulates instruction execution without needing real hardware.
To enable it: go to Project ➤ Options for Target ➤ Debug tab, and select Use Simulator.

| Advantage | Limitations |
| Early access — test at every stage of development | Peripheral access cannot be tested reliably |
| No hardware required | Memory timing is idealized (no wait states simulated) |
| Safely inject fault conditions | |
| Full visibility into data, registers, and instructions |
Use Target Debugging
Use Target Debugging
Target debugging connects to the real Tiva LaunchPad board through the Stellaris ICDI adapter.
Step 0: Connect the Board
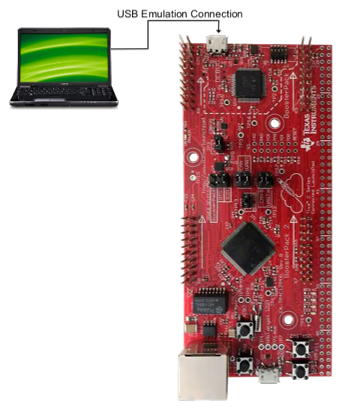
Before configuring the debugger, connect the Tiva LaunchPad board to your host PC using a USB cable, plugged into the board's Debug USB port (not the device/OTG USB port). Confirm that the board's power LED turns on.
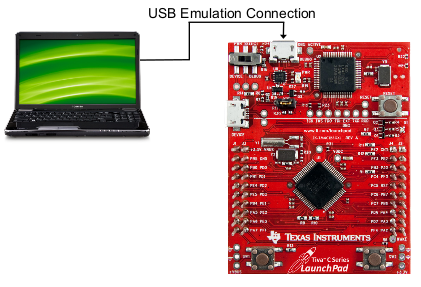
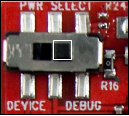
Make sure that the PWR SELECT switch in the upper left corner of the board is in the right DEBUG position.
Select the Stellaris ICDI Adapter
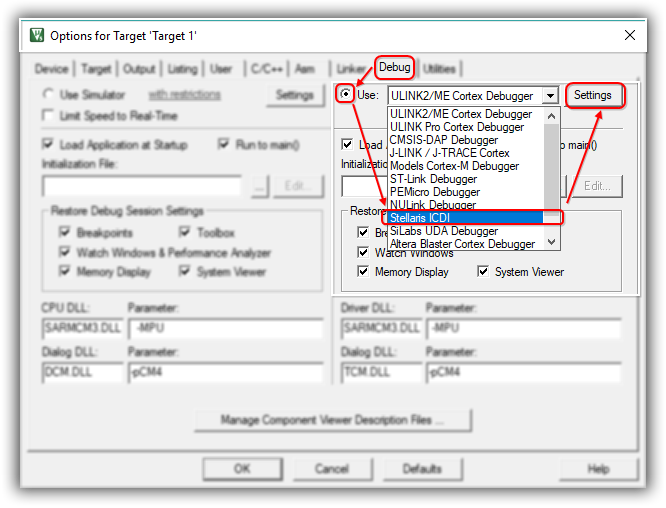
- Go to Project ➤ Options for Target... ➤ Debug tab.
- In the Use dropdown, select Stellaris ICDI.
- Click Settings. The Stellaris Debug Interface DLL window opens.
- Confirm that Stellaris USB ICDI appears in the Attached Devices box with a valid device number — this confirms the board is detected.
If you see an error or nothing appears in the Attached Devices box, make sure the Tiva LaunchPad board is properly connected via USB (see Lesson 01: Installing Software and Drivers).
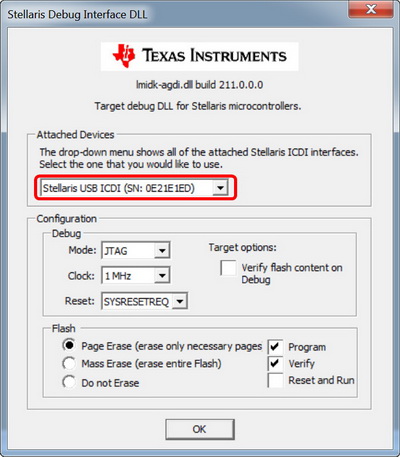
If you see an error, or nothing appears in the Attached Devices box, check the following possible causes:
- Driver not installed correctly — reinstall the Stellaris ICDI / Tiva driver (see Lesson 01: Installing Software and Drivers).
- Connected to the wrong USB port — make sure the cable is plugged into the board's Debug USB port, not the device/OTG USB port.
- USB cable does not support data transfer — some USB cables only support charging (power-only) and cannot transfer data. Try a different cable that is confirmed to support data transfer.
Configure the Flash Programming Driver
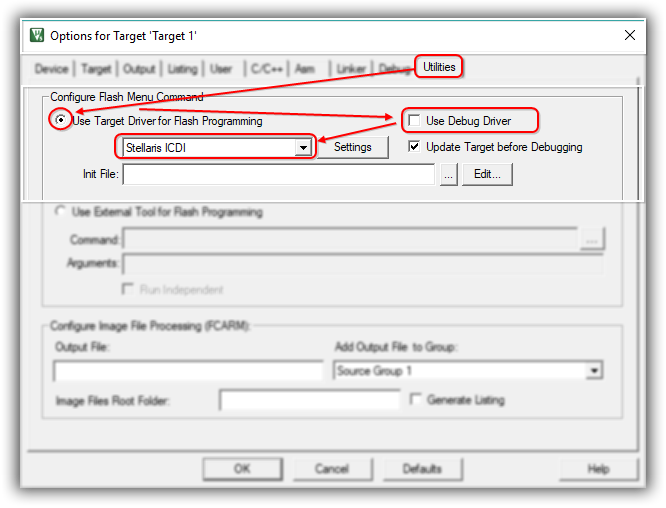
- In the same Options dialog, select the Utilities tab.
- Under Configure Flash Menu Command, select Use Target Driver for Flash Programming, uncheck Use Debug Driver, and select the Stellaris ICDI driver.
- Click OK to close the dialog.
Step 6 — Add main.c
Step 6 — Add main.c
6.1 Create the main.c File
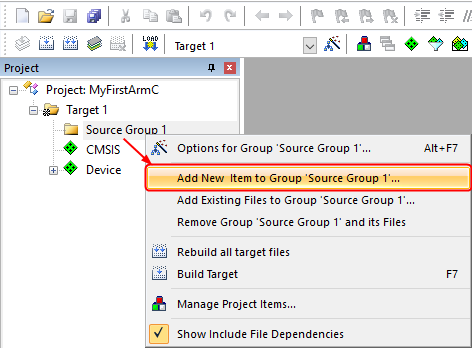
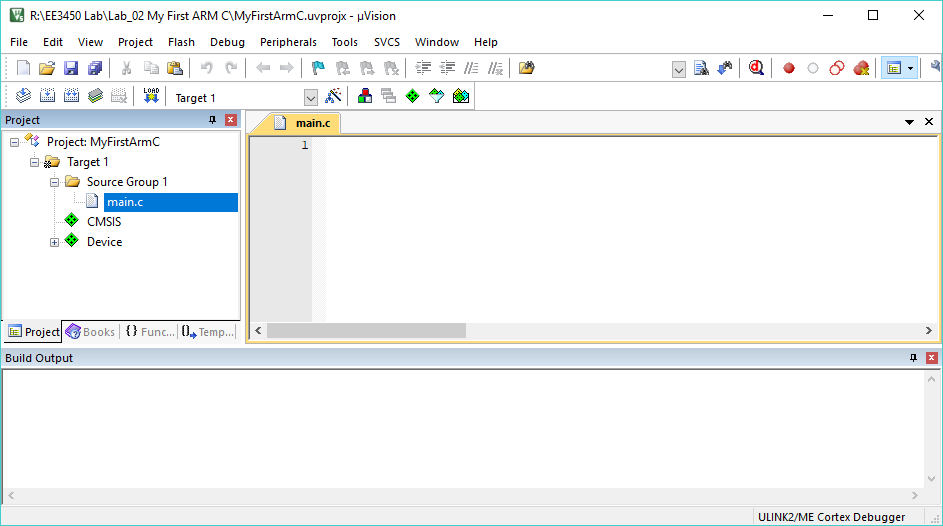
- In the Project window, right-click Source Group 1 and select Add New Item to Group 'Source Group 1'...
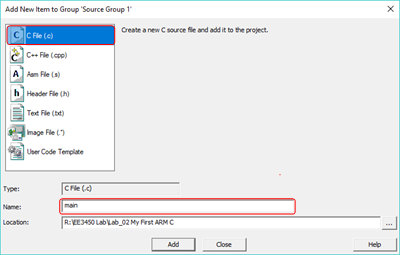
- In the dialog, select file type C File (.c), enter the name main.c, then click Add.
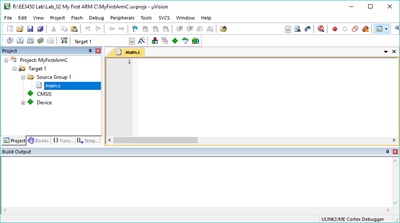
- The main.c file now opens in the edit window, and you're ready to write your first program.
6.2 Add the Template Code
If your lab assignment already provides a template firmware main.c file, use that file instead of the generic template below. Otherwise, you can use the following template code as your starting point.
Important: All template code (whether provided by the lab or shown below) is incomplete. You are expected to complete the code in accordance with your specific project requirements.
Copy the template code that matches your board:
EK-TM4C123GXL LaunchPad
/* This is the first C language program for Tiva LaunchPad that you see in the lab
 This program template was created by Airs Lin @ 2017 California State University of Los Angeles.
 When you write your program, you could have your info at the top document block
 For Example:  Your Name, Student Number, purpose of the program, etc.
*/

#include <stdio.h>
#include <stdlib.h>
#include <stdbool.h>
#include <stdint.h>

#include "TM4C123GH6PM.h"
#include "MyDefines.h"

int main(void)
{
    // Place your initialization/startup code here (e.g. Setup_GPIO())

    while(1) {
        // Place your application code here.

    }
}
EK-TM4C1294XL LaunchPad
/* This is the first C language program for Tiva LaunchPad you see in the lab
 This program template was created by Airs Lin @ 2017 California State University of Los Angeles.
 When you write your program, you could have your info at the top document block
 For Example:  Your Name, Student Number, what the program is for, and what it does etc.
*/

#include <stdio.h>
#include <stdlib.h>
#include <stdbool.h>
#include <stdint.h>

#include "TM4C1294NCPDT.h"
#include "MyDefines.h"

int main(void)
{
    // Place your initialization/startup code here (e.g. Setup_GPIO())

    while(1) {
        // Place your application code here.

    }
}
Step 7 — Build the Application
Step 7 — Build the Application
7.1 Rebuild the Project
Click the Rebuild button ( ) on the toolbar, or select Project ➤ Build Target from the menu.
7.2 Check the Build Output
The Build Output window at the bottom of the screen shows the results of the build process. Confirm that the build completed with 0 Errors before continuing to the next step.
Step 8 — Download and Run the Application
Step 8 — Download and Run the Application
8.1 Connect the Board
Connect the Tiva LaunchPad board to your computer via the Debug USB port, using a data-capable USB cable (see the troubleshooting tips in Step 52 if the board is not detected).
8.2 Review the Debug Adapter Settings
Click the Options for Target button ( ) on the toolbar and select the Debug tab. Verify that the correct debug adapter (Simulator or Stellaris ICDI) is still selected, as configured in Step 5.
8.3 Download the Application
Click the Download button ( ) on the toolbar to load the compiled application onto your target hardware. The Build Output window shows the download progress and confirms success.
8.4 Run the Application
Press the RESET button on the target board to start running your application.
Step 9 — Debug the Application
Step 9 — Debug the Application
9.1 Start a Debug Session
- Click Debug ➤ Start/Stop Debug Session, or click the corresponding toolbar button (
 ), to enter debug mode (either Simulator or hardware, based on your Step 2 configuration).
 - Click Debug ➤ Run, click the Run button (
 ) on the Debug toolbar, or press F5, to start executing your application.
To exit debug mode, click the Start/Stop Debug Session button again to return to Edit mode.
9.2 Common Debug Commands
The table below lists the most frequently used debug commands:
| Debug Menu | Toolbar | Shortcut | Description |
|---|---|---|---|
| Start/Stop Debug Session | |
Ctrl + F5 | Starts or stops a debugging session. |
| Start/Stop Energy Measurement Session |  |
Starts or stops an energy measurement-only session. | |
| Reset CPU |  |
Sets the CPU to RESET state. | |
| Run | |
F5 | Continues executing the program until the next active breakpoint is reached. |
| Stop |  |
Stops the program execution immediately. | |
| Step |  |
F11 | Executes a single-step into a function; Executes the current instruction line. |
| Step Over |  |
F10 | Executes a single-step over a function. |
| Step Out |  |
Ctrl + F11 | Finishes executing the current function and stops afterward. |
| Run to Cursor Line |  |
Ctrl + F10 | Executes the program until the current cursor line is reached. |
| Show Next Statement |  |
Shows the next executable statement/instruction. | |
| Breakpoints | Ctrl + B | Opens the dialog Breakpoints. | |
| Insert/Remove Breakpoint |  |
F9 | Toggles the breakpoint on the current line. |
| Enable/Disable Breakpoint |  |
Ctrl + F9 | Enables/disables the breakpoint on the current line. |
| Disable All Breakpoints |  |
Disables all breakpoints in the program. | |
| Kill All Breakpoints in Current Target |  |
Ctrl + Shift + F9 | Removes all breakpoints in the current target. |
| Kill All Breakpoints in Active Project |  |
Removes all breakpoints in the active project. | |
| Kill All Breakpoints in Multi-Project Workspace |  |
Removes all breakpoints in all projects of the workspace. |
Troubleshooting: If the debugger immediately exits right after entering debug mode, see KB 03: Keil Debugging Issue for the fix.