KB 01: Altera Quartus Prime Installation and Initial Setup Guide
This article focused on guiding users through installing Altera Quartus Prime (Lite) Edition and its associated drivers. Quartus Prime is a software tool developed by Intel for FPGA (Field-Programmable Gate Array) and CPLD (Complex Programmable Logic Device) design. The Lite Edition is a free version of this software that offers essential design and development features. This article includes step-by-step instructions on downloading the software from Intel's website, system requirements, and how to successfully install the Quartus Prime software and any necessary drivers on a compatible computer system.
KB01.1 Download and Install Altera Quartus Prime Software
To download the FPGA software from Intel, you must first create an account.
Register an account on the Altera website.
- Please register a Standard Access account on the following link:
https://customerlogin.altera.com/ - Fill in the personal information by using your campus email address and phone number in the application form.
- After you submit the registration form, Intel will send you an activation email. Please check your email system and click the link to activate your account.
Download Altera Quartus Prime Lite Software
- Download the FPGA development tools from the Altera website (Quartus Prime Software only supports Windows x64 and Linux)
You can download the Quartus Prime Lite (free license) or Standard (need a valid license) from the Altera Download Center for FPGAs: Download Altera Quartus Prime Software. - Looking for Altera Quartus Prime Lite Edition Design Software Version 25.x for Windows and click on it.
- On the Individual Files tab, download the following files:
- Quartus Prime Lite (QuartusLiteSetup-*****-windows.exe)
- Questa - Altera FPGA and Starter Editions (QuestaSetup-******-windows.exe)
- MAX 10 FPGA Device Support (max10-*****.qdz)
Install Altera Quartus Prime Lite
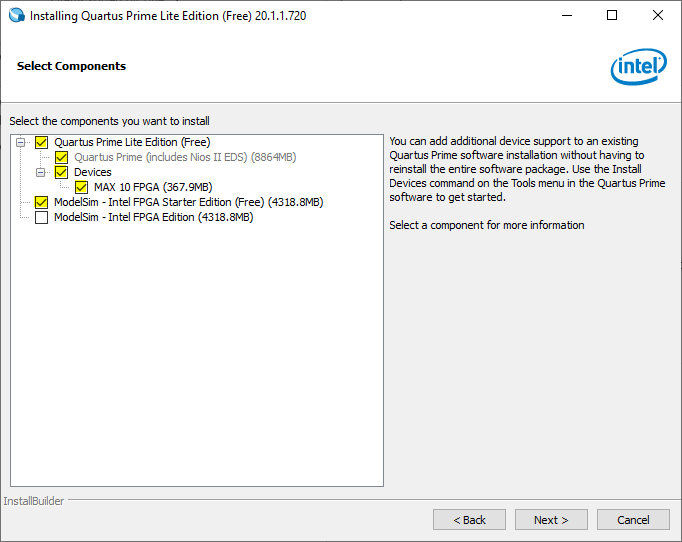
- Wait until all three files are completely downloaded. Open the download folder and double-click the QuartusLiteSetup-21.x.x.xxx-windows.exe to start the installation.

- The Altera Quartus Prime software installer is the primary installer. It installs other software if that installer exists in the same folder. Here, the installer will automatically select the MAX 10 Device and Questa - Intel FPGA Starter Edition (Free).
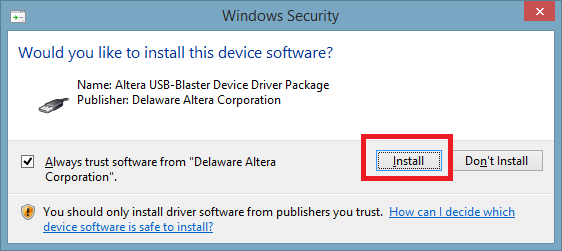
- After installing Quartus Prime and Questa on the computer, the installer will install the USB-Blaster driver.
KB01.2 Request a License File for Questa FPGA Starter Edition
Request a License File from Intel
The Altera Quartus Prime Lite Edition is free and does not require a license. Questa FPGA Starter Edition is also free, but requires zero-cost licenses. The Altera Quartus Prime Pro Edition software requires no license for Intel Cyclone 10 GX devices only.
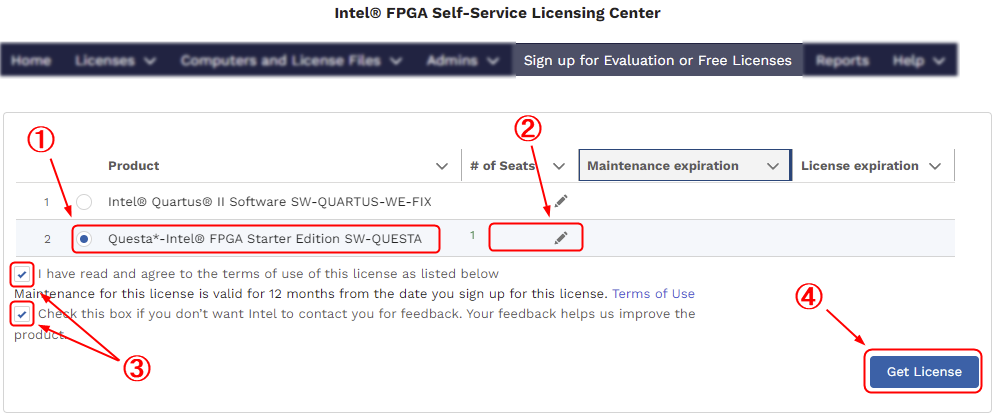
- You must log in to the Intel FPGA Self-Service Licensing Center to create and manage your licenses. From the Self-Service Licensing Center Home page, click Sign up for Evaluation or No-Cost License to request a license for Questa FPGA Starter Edition (License: SW-QUESTA).
Select Questa FPGA Starter Edition, enter 1 in the # of Seats field.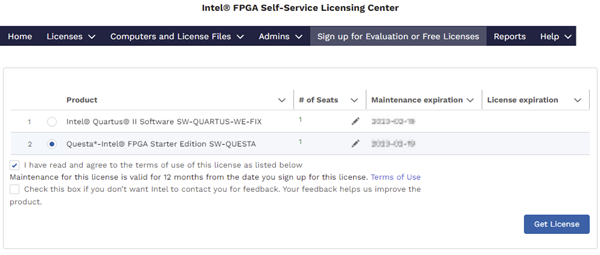
Once you have read the license terms of use, click the "I have read and agree to the terms of use of this license as listed below".
Proceed to click Get License. A window will pop up to ask which computer the license should be assigned to.
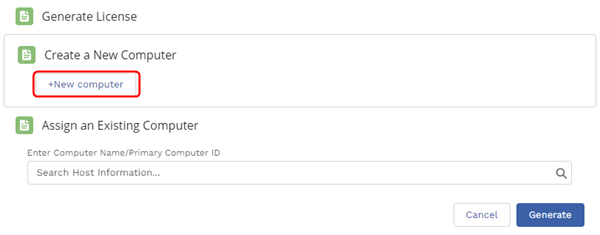
- Click +New computer to generate a new license for your computer.
- Open Command Prompt and type ipconfig /all to find the network interface card (NIC) on Windows. The command prints network information as below.
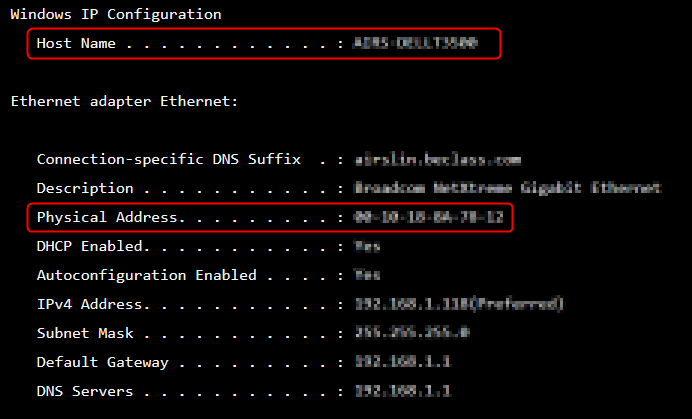
- The Computer Name appears as the Host Name.
- The Primary Computer ID is the number on the Physical Address line. This number is a 12-digit hexadecimal number.
If the system has more than one network card, you can use the NIC ID of any network card connected to the computer.
- Enter the information in the following dialog to generate a new license for your computer.
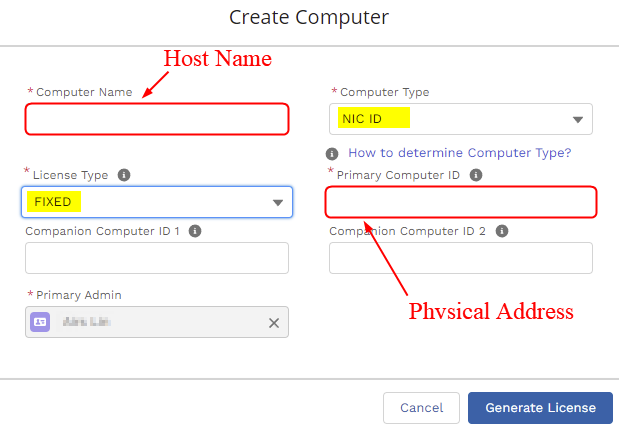
- Click Generate License, and Intel will send the license file to the email address in your My Intel account profile.
Set up the License for the Questa-Intel FPGA Starter Edition Software
Download the license file from the email and save it in the IntelFPGA or IntelFPGA_lite folder.
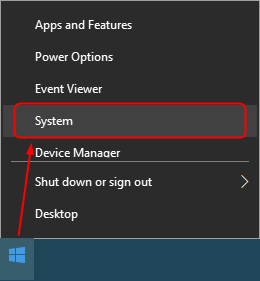
- Right-click the Windows Start icon, then select System.
- Click Advanced System Settings to open the System Properties dialog.
- In the Advanced tab, click Environment Variables.... In the System Variables, create a New variable with the name = SALT_LICENSE_SERVER, and click Browse file... to locate the license file.
- Click OK.
KB01.3 Configure Quartus Prime Lite for First-Time Use
Configure Quartus Prime Lite for First-Time Use
After successfully installing Quartus Prime Lite, it is a good idea to review several important settings before creating your first FPGA project. These initial settings can help prevent common file path issues, reduce unnecessary workspace restore errors, improve code formatting, and make simulation tools work correctly.
In this section, we will review the most important items under Tools > Options.
1. Recommended First-Time Setup Checklist
After installing Quartus Prime Lite, it is strongly recommended to check the following categories:
- General
- EDA Tool Options
- Text Editor (if available)
These settings are simple, but they can save a lot of time later when students begin creating projects, editing HDL files, and running simulation.
2. General Settings
Open Tools > Options > General and review the items below.
| Setting | Recommended Action | Reason |
|---|---|---|
| Re-open current workspace when opening project | Uncheck | Prevents Quartus from automatically restoring the previous workspace layout and previously opened windows. |
| Re-open current files when opening project | Uncheck | Prevents Quartus from reopening previously opened files from outdated or moved paths. |
| Default file location | Set to a dedicated local FPGA project folder | Keeps all FPGA projects organized in one location and avoids common cloud-sync problems. |
Recommended Default File Location
Create a dedicated folder at the root of a local drive and use it as the default location for all FPGA-related projects.
C:\EE4480_FPGA_Projects
D:\EE4480_FPGA_Projects
D:\EE4480_Quartus_Projects
Do not place the default project location under a OneDrive synchronization folder. On many Windows 11 computers, OneDrive automatically synchronizes files under Desktop and Documents. If FPGA project files are stored there, file access, synchronization, or path-related issues may occur.
Examples of Locations to Avoid
C:\Users\YourName\OneDrive\Documents\
C:\Users\YourName\OneDrive\Desktop\
C:\Users\YourName\Documents\    (if redirected to OneDrive)
C:\Users\YourName\Desktop\      (if redirected to OneDrive)
3. EDA Tool Options
Open Tools > Options > EDA Tool Options and verify that the simulator path is correct.
| Setting | Recommended Action | Reason |
|---|---|---|
| Questa Altera FPGA | Make sure it points to the correct installation folder | Quartus uses this path when launching the simulation tool from the GUI. |
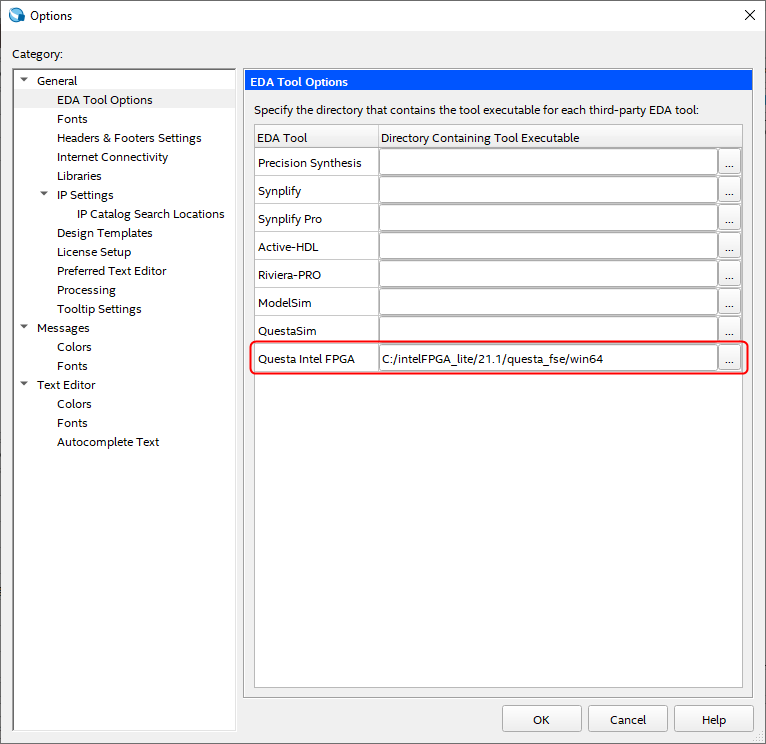
Typical Default Example
If Quartus was installed in the default location, the simulator folder is usually similar to:
Questa - Intel Starter (Free): C:\altera_lite\<version>\questa_fse\win64
Questa - Intel Standard: C:\alteraFPGA\<version>\questa_fe\win64
If Quartus was installed in a custom location, do not assume that this path is correct. Check the actual installation folder and update the setting manually if necessary.
4. Text Editor
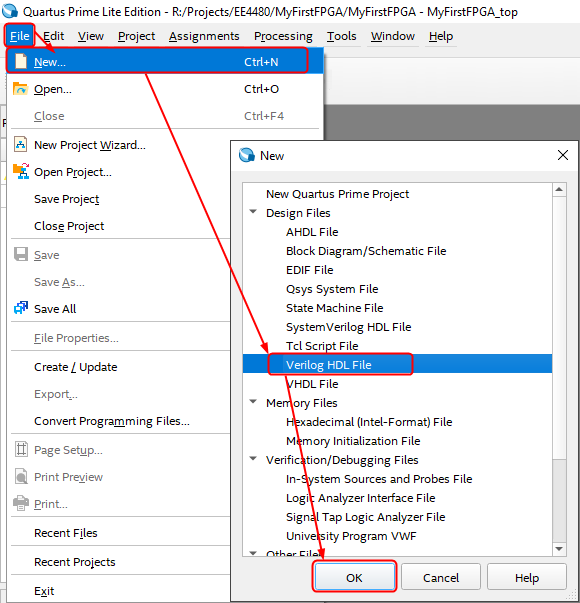
In some cases, the Text Editor category may not appear immediately. If you do not see it, create a new Verilog HDL file first, then reopen Tools > Options.
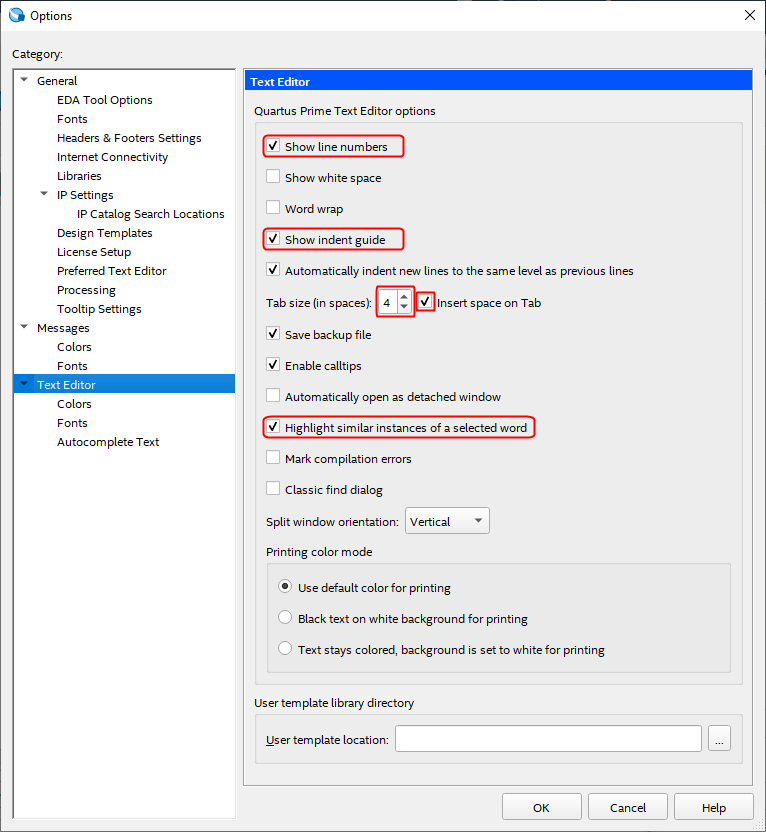
Then open Tools > Options > Text Editor and review the following items:
| Setting | Recommended Action | Reason |
|---|---|---|
| Show indent guide | Check | Makes code indentation easier to read. |
| Tab size (in spaces) | Set to 4 | Keeps HDL formatting consistent and easier to maintain. |
| Insert space on Tab | Check | Uses spaces instead of tab characters for more consistent alignment. |
| Save backup file | Check | Creates a backup copy when saving, which can help recover accidental edits. |
5. Suggested Minimum Setup
Before creating FPGA projects, the following minimum setup is recommended:
- Uncheck Re-open current workspace when opening project.
- Uncheck Re-open current files when opening project.
- Set the Default file location to a local FPGA project folder outside OneDrive.
- Verify the Questa Altera FPGA path in EDA Tool Options.
- Enable Show indent guide in Text Editor.
- Set Tab size to 4 and enable Insert space on Tab.
- Enable the Save backup file.
6. Summary
A good first-time Quartus configuration should accomplish three things:
- Prevent unnecessary workspace and file restore behavior.
- Store projects in a clean local folder outside OneDrive synchronization.
- Make HDL editing and simulation setup more consistent from the beginning.
With these settings in place, Quartus Prime Lite becomes easier to use, easier to maintain, and less likely to cause confusion for new users.
KB01.4 Recommended Quartus Project Folder Structure
Recommended Quartus Project Folder Structure
Before creating your first FPGA project, it is a good idea to define a standard project folder structure. A clean, consistent folder layout makes Quartus projects easier to manage, back up, and troubleshoot. It also helps prevent path-related problems when files are moved, renamed, or reopened later.
In this section, we will introduce a recommended Quartus project folder template, explain the roles of key project files, and summarize best practices for writing the .qsf file and avoiding common workspace path issues.
1. Why a Standard Project Folder Matters
Many beginner problems in Quartus are not caused by HDL syntax errors. Instead, they are caused by project organization problems such as:
- Source files saved in random folders
- Old file paths are remaining in the project
- Duplicate copies of the same file in different locations
- Projects stored in synchronized cloud folders
- Workspace files are trying to reopen files from outdated paths
A standard folder template helps reduce all of these problems from the start.
2. Recommended Quartus Project Folder Template
The following is a recommended general-purpose folder structure for Quartus Prime Lite projects:
EE4480_FPGA_Projects/
|-- 01_my_fpga_project/
│   |-- my_fpga_project.qpf
│   |-- my_fpga_project.qsf
│   |-- my_fpga_project.sdc
|   |-- source/
|   │   |-- my_fpga_project_top.v
|   │   |-- alu.v
|   │   |-- regfile.v
|   │   |-- control.v
|   │   |-- datapath.v
|   │   `-- ...
|   |-- sim/
|   │   |-- my_fpga_project_top_tb.v
|   │   |-- test_program.hex
|   │   `-- ...
|   |-- constraint/
|   │   `-- extra_constraints.sdc
|   |-- docs/
|   │   `-- design_notes.md
|   |-- db/
|   |-- incremental_db/
|   |-- output_files/
|   `-- simulation/
Recommended Use of Each Folder
| Folder / File | Purpose |
|---|---|
| source/ | Store all design source files, such as Verilog HDL files. |
| sim/ | Store testbenches, memory initialization files, and simulation-only files. |
| constraint/ | Store optional timing or pin assignment files if additional constraint files are needed. |
| docs/ | Store design notes, architecture diagrams, and project documentation. |
| .qpf | Quartus project file. |
| .qsf | Quartus settings file. Stores source file assignments, device settings, and project options. |
| .sdc | Timing constraints file. |
| db/, incremental_db/, output_files/, simulation/ | Generated Quartus data and compilation outputs. Do not store source code here. |
3. Important Quartus Project Files
Two Quartus files are especially important when managing project structure:
- .qsf stores the project assignments such as source files, top-level entity, device settings, and timing constraints.
- .qws is a workspace file. It remembers editor tabs, window positions, and other session-related information.
In simple terms, the .qsf file defines the project configuration, while the .qws file remembers how the Quartus workspace looked during the previous session.
4. Recommended .qsf Writing Style
A good .qsf file should use relative paths and explicitly list each design file. This makes the project easier to move and easier to maintain.
set_global_assignment -name FAMILY "MAX 10"
set_global_assignment -name DEVICE 10M50DAF484C7G

set_global_assignment -name TOP_LEVEL_ENTITY my_fpga_project_top

set_global_assignment -name SEARCH_PATH source

set_global_assignment -name SDC_FILE my_fpga_project.sdc

set_global_assignment -name VERILOG_FILE source/my_fpga_project_top.v
set_global_assignment -name VERILOG_FILE source/alu.v
set_global_assignment -name VERILOG_FILE source/regfile.v
set_global_assignment -name VERILOG_FILE source/control.v
set_global_assignment -name VERILOG_FILE source/datapath.v
Best Practices for Writing the .qsf File
- Use relative paths such as source/my_fpga_project_top.v.
- Do not use absolute paths unless there is a special reason.
- List each HDL file explicitly with VERILOG_FILE.
- Use one assignment per line.
- Keep the top-level entity name as a module name only, not a path or filename.
- Do not keep duplicate references to the same file in different folders.
5. Common Workspace Path Problem
One common problem in Quartus happens when source files are moved into a new folder such as source/, but Quartus still tries to reopen old file tabs from the previous location. In this case, the project settings may already be correct, but the workspace still remembers the old editor paths.
This usually means the problem is related to the .qws workspace file, not the .qsf project configuration.
Typical Symptom
- You moved HDL files into the source/ folder.
- You updated the project correctly.
- When Quartus reopens the project, it still tries to open the old file tabs from the old location.
- A file-not-found message appears even though the project file assignments are already correct.
6. How to Avoid .qws Path Problems
- Before closing a project, close all open source files first.
- If source files were moved or reorganized, close Quartus and delete the old .qws file.
- Reopen the project after the workspace file is removed.
- Keep the source/ folder as the permanent home of your HDL design files.
- Avoid storing duplicate source files in the project root and the source/ folder at the same time.
Recommended Cleanup Procedure
1. Close Quartus.
2. Confirm that the .qsf file uses the correct relative paths.
3. Delete the old .qws file.
4. Reopen the .qpf project file.
5. If needed, also delete db/ and incremental_db/ before recompiling.
7. Recommended Daily Workflow
The following workflow is recommended for students and instructors:
- Create a dedicated project folder before starting the project.
- Create a source/ folder and save all HDL files there.
- Create a sim/ folder for testbenches and simulation files.
- Use relative paths in the .qsf file.
- Keep only one valid copy of each design file.
- Before closing the project, close all open editor tabs.
- If a path problem appears after moving files, clear the old workspace state by deleting the .qws file.
8. Quick Troubleshooting Table
| Problem | Likely Cause | Suggested Fix |
|---|---|---|
| Quartus cannot find a file when opening the project | Old editor tabs stored in the workspace | Delete the .qws file and reopen the project |
| Quartus compiles the wrong file or reports duplicates | Multiple copies of the same HDL file in different folders | Keep only one valid source file and update the .qsf file |
| Project becomes difficult to maintain | No standard folder structure | Adopt the standard project template and keep source files under source/ |
| Build artifacts consume too much space or behave strangely | Old generated databases remain in the project folder | Clean db/ and incremental_db/ if necessary |
9. Summary
A good Quartus project structure should do the following:
- Keep all source files in a dedicated source/ folder.
- Use a clear and repeatable folder layout.
- Use relative paths in the .qsf file.
- Separate design files, simulation files, documentation, and generated files.
- Understand that the .qsf file controls the project configuration, while the .qws file controls the workspace session.
If students follow this structure from the beginning, their Quartus projects will be cleaner, easier to debug, and much easier to maintain over time.
KB01.5 Install USB Blaster Driver in Windows 11
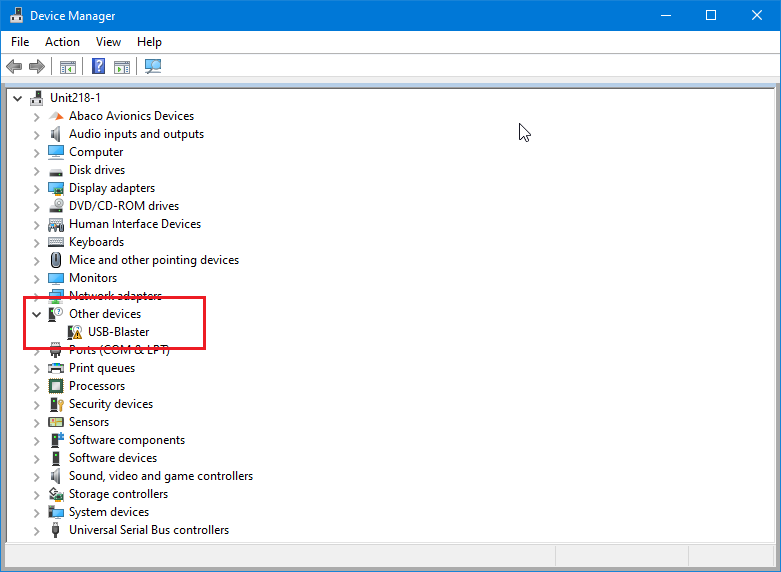
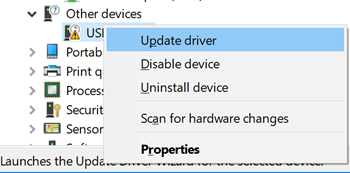
If you are using the Intel FPGA board, you must connect it to your computer via USB. Then, right-click on the Windows Start button ![]() to launch the Device Manager.
to launch the Device Manager.
Follow the steps below to install the driver.
Follow the steps to install the driver.
- Right-click on the USB-Blaster and select Update driver.
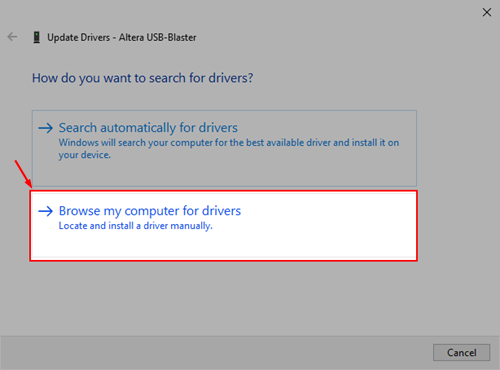
- A window prompt asks: How do you want to search for driver software? Select Browse my computer for drivers.
- Under Search for driver software in this location, click Browse.
Browse to the C: driver, open the IntelFPGA_lite ➤ <Version> ➤quartus ➤drivers folder, then click OK. Make sure the Include subfolders option is checked, then click Next.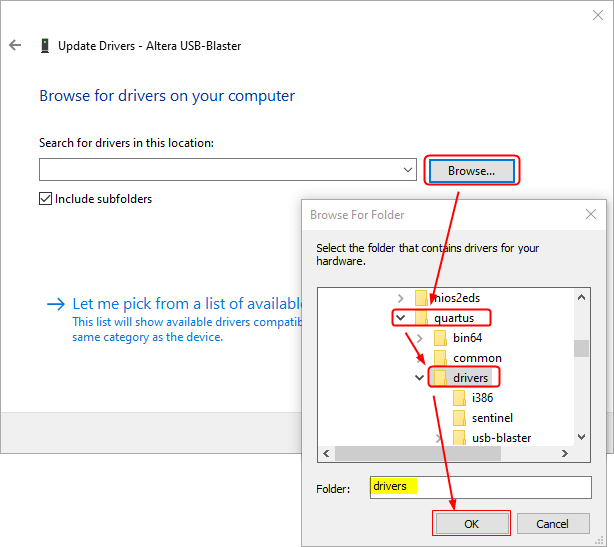
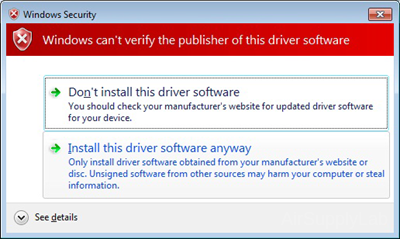
- A warning may appear that says Windows can't verify the publisher of this driver software. This message appears because the driver is not signed. Click Install this driver software anyway to proceed.
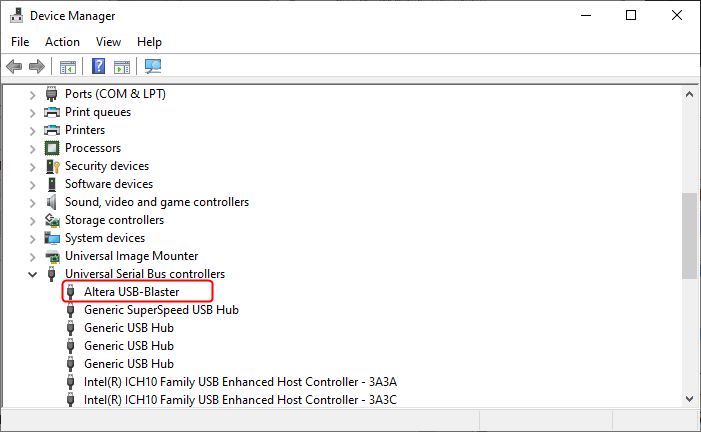
- Click the Close button when you see the "Windows has successfully updated your driver software" dialog.