Lesson 05: Hailo 8/8L AI Module installation
The Hailo 8 and Hailo 8L AI modules are powerful M.2 2230 AI accelerators that integrate seamlessly with the Raspberry Pi 5. The full-featured Hailo 8 delivers up to 26 TOPS, while the compact Hailo 8L provides 13 TOPS. Together, they dramatically boost the Pi 5’s ability to run complex AI models — ideal for real-time image recognition, object detection, and other demanding edge-AI tasks — delivering advanced, energy-efficient performance with minimal power consumption.
Using the Hailo AI Module with Raspberry Pi 5
To ensure optimal performance when using the Hailo AI acceleration module, follow these recommendations:
Recommended Hardware:
- Use a Raspberry Pi 5 with 8GB or 16GB of RAM.
- Ensure active cooling is installed – preferably the official Raspberry Pi active cooler.
- Use a USB-C power supply that is fully compatible with Raspberry Pi 5.
- For improved data read/write speeds, consider adding an SSD flash drive.

Figure 5.1(a): Installing the Hailo AI Module only on the Raspberry Pi 5
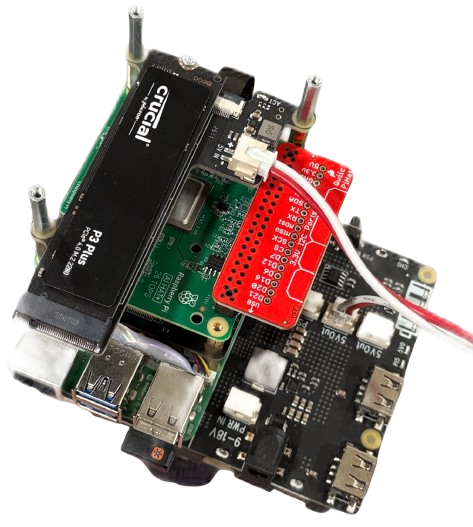
Figure 5.1(b): Add SSD Flash memory, UPS, and Hailo AI Modules
5.1 Install Hailo AI Module
Update OS, firmware & bootloader
SSH into (or locally log in to) your Pi and run:
sudo apt update && sudo apt full-upgrade
sudo rpi-eeprom-update
Then launch the configuration tool:
sudo raspi-config
- Advanced Options → Bootloader Version: select E1 Latest, finish, and reboot.
- After reboot, apply any remaining EEPROM updates:
sudo rpi-eeprom-update -a
sudo reboot
Enable PCIe Gen 3 mode
Re-open the config tool:
sudo raspi-config- Advanced Options → A8 PCIe Speed: choose Yes to enable Gen 3, then reboot.
Install the Hailo SDK & GStreamer plugins
sudo apt install hailo-all
sudo apt-get install gstreamer1.0-plugins-ugly
sudo reboot
Verify the installation
Identify the Hailo device:
hailortcli fw-control identifyYou should see something like:
Executing on device: 0000:01:00.0
Board Name: Hailo-8
Device Architecture: HAILO8L
Check the Hailo GStreamer tools plugin:
gst-inspect-1.0 hailotoolsLook for “Plugin Details: Name hailotools”
Check the main Hailo GStreamer plugin:
gst-inspect-1.0 hailoYou should see elements like hailonet, hailodevicestats, etc.
Once these steps are complete, your Raspberry Pi 5 will automatically detect the on-board Hailo NPU, and you can run any AI-accelerated demos, such as the built-in rpicam-apps camera examples, or dive into the Hailo RPi5 Examples on GitHub to explore Python-based pipelines.
Hailo-8/8L AI Module Demo Guide for Raspberry Pi 5
Install & Prepare
- Update package lists and install rpicam-apps
sudo apt update && sudo apt install rpicam-apps - Common command-line options for rpicam-hello:
- -t 0: run in continuous capture ("test") mode
- -n: disable the preview window
- -v 2: output only textual results (no video)
- --post-process-file <path>: specify the JSON post-precessing file
- --framerate <fps>: set capture framerate (used by some demos)
Object Detection
Draws bounding boxes around detected objects. You can also run in text-only mode.
- Default demo (YOLOv6)
rpicam-hello -t 0 --post-process-file /usr/share/rpi-camera-assets/hailo_yolov6_inference.json - Preview disabled, text-only
rpicam-hello -t 0 -n -v 2 --post-process-file /usr/share/rpi-camera-assets/hailo_yolov6_inference.json - Alternative models
- YOLOv8:
rpicam-hello -t 0 --post-process-file /usr/share/rpi-camera-assets/hailo_yolov8_inference.json - YoloX:
rpicam-hello -t 0 --post-process-file /usr/share/rpi-camera-assets/hailo_yolox_inference.json - YOLOv5 (Person & Face):
rpicam-hello -t 0 --post-process-file /usr/share/rpi-camera-assets/hailo_yolov5_personface.json
- YOLOv8:
Image Segmentation
Applies a color mask to each detected object.
rpicam-hello -t 0 --post-process-file /usr/share/rpi-camera-assets/hailo_yolov5_segmentation.json --framerate 20
Pose Estimation
Performs 17-point human pose estimation and draws the skeleton.
rpicam-hello -t 0 --post-process-file /usr/share/rpi-camera-assets/hailo_yolov8_pose.json
Locking Specific Package Versions
To match your driver/tooling versions exactly:
- Unhold packages (if previously held)
sudo apt-mark unhold hailo-tappas-core hailort hailo-dkms python3-hailort - Install the desired version (e.g., v4.19)
sudo apt install hailo-tappas-core=3.30.0-1 hailort=4.19.0-3 hailo-dkms=4.19.0-1 python3-hailort=4.19.0-2 - Hold them to prevent upgrades
sudo apt-mark hold hailo-tappas-core hailort hailo-dkms python3-hailort
You’re now ready to explore all the Hailo NPU demos on your Raspberry Pi 5!
5.2 Troubleshooting Guide
a. Hailo AI HAT with PCIe Switch board
Hailo Module with PCIe Switch board
If you connect the Hailo AI HAT to the PCIe switch board, then the Pi 5 may have some MSI interrupt errors. This issue happens because the Hailo-8/8L module is hanging off a PCIe switch (for example, an M.2 HAT), and the Pi 5’s default device-tree does not assign the correct MSI interrupt parent for that topology. As a result, the driver’s calls to enable MSI return error – 28 (ENOSPC), and the board never fully activates.
How to fix it
You need to load a PCIe compatibility overlay so that the kernel uses the proper interrupt parent and can successfully enable MSI on the Hailo board.
- Edit the config.txt
On Raspberry Pi OS Bullseye (and later):sudo nano /boot/firmware/config.txt - Add the overlay
At the end of the file, append:
This overlay corrects the MSI interrupt parent for devices behind a PCIe switch, allowing the Hailo driver to enable MSI successfully.dtoverlay=pciex1-compat-pi5,no-mip - (Optional) If you’re using Pineboards’ M.2 HAT AI Kit instead, you can use its dedicated overlay:
dtoverlay=pineboards-hat-ai - Save and reboot
sudo reboot - Verify
After reboot, run dmesg again. You should no longer see Failed to enable MSI -28 (or similar), and your Hailo module should initialize normally.
b. Hailo Driver Error
Problem Description
After installing the Hailo driver and HailoRT on Raspberry Pi 5, running:
hailortcli fw-control identifyResults in the following error:
[HailoRT] [error] CHECK failed - Failed to open device file /dev/hailo0 with error 5
[HailoRT CLI] [error] CHECK_SUCCESS failed with status=HAILO_DRIVER_OPERATION_FAILED(36)
Even though /dev/hailo0 exists and has correct permissions, the device cannot be accessed.
Identifying the Problem
Check system logs using:
dmesg | grep hailoYou may see:
hailo 0001:07:00.0: Unable to change power state from D3hot to D0, device inaccessible
hailo 0001:07:00.0: Failed waking up board -5
Root Cause
- The Hailo PCIe device enters D3hot low-power state after initialization.
- Raspberry Pi 5 has incomplete PCIe ASPM (Active State Power Management) support.
- The device fails to wake up, causing the error even though the device file exists.
Verification Steps
- Check if the device file exists:
ls -l /dev/hailo* - Check if the driver is loaded:
lsmod | grep hailo - Check PCIe device detection:
lspci | grep Hailo - Check the system log for power state errors:
dmesg | grep hailo
Solutions
Solution 1: Disable PCIe ASPM (Recommended)
- Edit kernel command line:
sudo nano /boot/firmware/cmdline.txt - Add the following at the end of the single line:
pcie_aspm=off - Example:
console=serial0,115200 console=tty1 root=PARTUUID=xxxx rw rootwait pcie_aspm=off - Save and reboot:
sudo reboot - Verify:
hailortcli fw-control identify
Solution 2: Disable ASPM in the Driver
- Create a driver options file:
echo "options hailo_pci disable_aspm=1" | sudo tee /etc/modprobe.d/hailo_pci.conf - Reload the driver:
sudo modprobe -r hailo_pci
sudo modprobe hailo_pci
Solution 3: Lock PCIe Speed to Gen2
- Edit the config file:
sudo nano /boot/firmware/config.txt - Add:
dtparam=pciex1_gen=2 - Reboot and check speed:
It should showlspci -vvv -s 0001:07:00.0 | grep LnkStaSpeed 5GT/s(Gen2).
Summary
- Problem: Hailo PCIe device cannot wake from D3hot state on Raspberry Pi 5.
- Cause: Incomplete PCIe ASPM support on Raspberry Pi 5.
- Best Fix: Disable ASPM by adding
pcie_aspm=offto the kernel boot parameters.
5.3 Hailo-8 AI Environment Setup with Conda on Raspberry Pi 5
Hailo-8 AI Environment Setup with Conda on Raspberry Pi 5
1. Prerequisites
- Raspberry Pi 5 with 64-bit Raspberry Pi OS
- Hailo-8/8L module connected (PCIe or USB)
- Hailo drivers and tools installed via:
sudo apt install hailo-all - Conda (Miniconda, Mambaforge, or Anaconda) installed
- Camera connected and tested
- Internet connection
2. Check and Update Conda
- Check Conda version:
conda --version - Update Conda (recommended):
conda activate base
conda update -n base -c defaults conda
3. Create Project Directory
mkdir -p /ssd/MyProjects/hailo8_lab
cd /ssd/MyProjects/hailo8_lab
- mkdir -p: Creates the folder and parents if missing
- cd: Enters your new project folder
4. Create a Conda Environment in Local Subfolder
conda create -y --prefix ./.conda python=3.9- -y: Automatically confirms prompts
- --prefix ./.conda: Environment will be created in a local
.condasubdirectory - python=3.9: Specifies Python version 3.9
Activate the environment:
conda activate ./.conda5. Install Required Python Packages
pip install tensorflow==2.13 tflite-runtime opencv-python jupyter- tensorflow==2.13: TensorFlow (for model conversion)
- tflite-runtime: For TensorFlow Lite inference
- opencv-python: Camera and image processing
- jupyter: Jupyter Notebook/Lab
Note: Do not try to install hailort via pip; use the system-provided python3-hailort package.
6. Enable HailoRT Python API in Your Conda Environment
The python3-hailort package is installed system-wide, not in your Conda environment. To use HailoRT in your Conda Python, do one of the following:
A. Use sys.path in your Python scripts or notebooks
import sys
sys.path.append('/usr/lib/python3/dist-packages/hailo_platform/drivers')
import hailort
print(dir(hailort))
print(hailort.__file__)
B. Create a symbolic link to hailort in your Conda environment
- Find the system
hailortpackage path:find /usr/lib/ -name "hailort" -type d - Link it to your Conda environment’s site-packages:
python -c "import site; print(site.getsitepackages()[0])"
# Suppose output is /ssd/MyProjects/handwriting_lab/.conda/lib/python3.9/site-packages
ln -s /usr/lib/python3/dist-packages/hailo_platform/drivers/hailort /ssd/MyProjects/handwriting_lab/.conda/lib/python3.9/site-packages
7. Verify Hailo-8 Environment
- Test Hailo driver module:
lsmod | grep hailoShould show
hailo_pcior similar - Show Hailo device presence:
hailortcli scan - Test Python HailoRT in Conda:
import sys
sys.path.append('/usr/lib/python3/dist-packages/hailo_platform/drivers')
import hailort
print(dir(hailort))
8. (Optional) Start JupyterLab
jupyter lab --ip=0.0.0.0 --port=8888 --no-browser --allow-root --NotebookApp.token='' --NotebookApp.password=''- Open in browser:
http://<your-pi-ip>:8888/lab
9. Ready for Development!
- TensorFlow/TFLite for model conversion and inference
- HailoRT (system-provided) accessible in Python
- Camera and OpenCV ready for computer vision
- Jupyter for interactive workflow
Troubleshooting Tips
- If
import hailortfails. Check you usedsys.path.appendor symlink correctly - If no Hailo device is detected, check hardware connection and driver status with
lsmod | grep hailo - Do not install
hailortwith pip — always use the system package
Summary Table
| Step | Command/Example | Explanation |
|---|---|---|
| Check Conda | conda --version |
Show conda version |
| Update Conda | conda update -n base -c defaults conda |
Update Conda in base environment |
| Create env | conda create -y --prefix ./env python=3.9 |
Create local environment |
| Activate env | conda activate ./env |
Activate your environment |
| Install packages | pip install tensorflow==2.13 tflite-runtime opencv-python jupyter |
Install AI and computer vision tools |
| Enable HailoRT | sys.path.append('/usr/lib/python3/dist-packages/hailo_platform/drivers') or symlink |
Access HailoRT Python API in Conda |
| Test Hailo CLI | hailortcli list-devices |
List Hailo-8 devices |
Your Hailo-8 Conda-based AI environment is now ready for model deployment and real-time inference!