Lesson 01: Set Up Your Pi Board
1.1 Seting Up Raspberry Pi Boards
Step 1: Gather Your Components
Required:
- Raspberry Pi Board (3, 4, or 5)
- MicroSD Card (minimum 16GB, class 10 recommended)
- MicroSD Card Reader
- Power Supply: The following table shows the USB-PD power mode required to power various Raspberry Pi models. You can use any high-quality power supply that provides the correct power mode.
Model Recommended power supply (voltage/current) Raspberry Pi power supply Raspberry Pi 5 5V/5A
5V/3A limits peripherals to 600mA45W USB-C Power Supply
27W USB-C Power SupplyRaspberry Pi 4 Model B 5V/3A 15W USB-C Power Supply Raspberry Pi 3 (all models) 5V/2.5A 12.5W Micro USB Power Supply Raspberry Pi 2 (all models) 5V/2.5A 12.5W Micro USB Power Supply Raspberry Pi 1 (all models) 5V/2.5A 12.5W Micro USB Power Supply Raspberry Pi Zero (all models) 5V/2.5A 12.5W Micro USB Power Supply - HDMI Cable (micro HDMI for Pi 4/5, standard HDMI for Pi 3)
- Monitor or TV
- USB Keyboard and Mouse
Optional:
- A Case for Raspberry Pi
- Ethernet Cable (for wire internet connection)
- USB Wi-Fi Adapter (if using Pi 3 without built-in WiFi)
- Heatsinks or Fans (recommended for Pi 4/5)
Step 2: Prepare the MicroSD Card
- Download Raspberry Pi OS:
Visit the Raspberry Pi Downloads page and download the Raspberry Pi Imager or Raspberry Pi OS image. - Install Raspberry Pi Imager:
Install the Raspberry Pi Imager on your computer. - Write the OS Image:
- Insert the MicroSD card into the card reader and connect it to your computer.
- Open Raspberry Pi Imager, select the OS image and choose your MicroSD card as the storage device.
- Click "Write" to start writing the image to the card. This process may take a few minutes.
Step 3: Set Up the Hardware
- Insert MicroSD Card:
Remove the MicroSD card from your computer and insert it into the MicroSD card slot on the Raspberry Pi. - Connect Monitor and Peripherals:
- Connect the HDMI cable from the Raspberry Pi to your monitor or TV.
- Plug in the USB keyboard and mouse.
- Connect to Network:
- For a wired connection, plug in the Ethernet cable.
- For a wireless connection, you'll configure Wi-Fi during the software setup.
- Power Up the Raspberry Pi:
Connect the power supply to the Raspberry Pi and plug it into a power outlet. The Raspberry Pi should boot up, and you should see the Raspberry Pi logo and boot messages on the screen.
Step 4: Initial Software Setup
Update software
After booting, keep the software running on your Raspberry Pi and update it to the latest version. This keeps your device secure from vulnerabilities and ensures you get the latest bug fixes.
sudo apt update
sudo apt full-upgrade
Configure Pi Board
raspi-config
Raspberry Pi Desktop users can access a graphical version of this application at Preferences > Raspberry Pi Configuration. However, some advanced configurations are only available in the raspi-config.
raspi-config helps you configure your Raspberry Pi. Available options may differ between Raspberry Pi models. To open the configuration tool, run the following command:
sudo raspi-config
raspi-config automates edits to /boot/firmware/config.txt and various Linux configuration files. Some options require a reboot to take effect. If you change any of these, raspi-config asks you to reboot when you exit.
Expand filesystem
Expands your OS partition to fill the whole storage device, giving you more space to use for files. Click Advanced Options > Expand filesystem, then reboot your Raspberry Pi to complete this action. Usually, Raspberry Pi OS runs this action on the first boot. This option can be useful if you clone your OS to a separate storage device with more capacity than the original.
Enable SSH, VNC, SPI, I2C, Serial Port, and 1-Wire Interfaces
Click the 'Interface Options' to enable and disable various physical and virtual interfaces.
Configure Localisation options
Click 'Localisation Options" to configure location, timezone, keyboard, and WLAN country-related options.
Screen Blanking
You can configure your Raspberry Pi to blank the screen after a period of inactivity. By default, Raspberry Pi OS blanks the screen after ten minutes of inactivity when screen blanking is enabled.
- Raspberry Pi Configuration:
- Click the Raspberry Pi button in the menu bar. Navigate to Preferences > Raspberry Pi Configuration.
- Select the Display tab. Toggle the Screen Blanking radio button into the on position. Press OK to confirm your selection
- CLI:
- You can enable and disable screen blanking with the raspi-config CLI tool. Run the following command to open the tool.
sudo raspi-config - Use the arrow keys to navigate and the Enter key to select. Select Display Options > Screen Blanking. Choose yes with the arrow keys to enable screen blanking or no to disable screen blanking.
- You can enable and disable screen blanking with the raspi-config CLI tool. Run the following command to open the tool.
non-interactive raspi-config
The raspi-config tool also supports non-interactive options and flags that change options entirely on the command line with no visual component. Available options may differ between Raspberry Pi models.
sudo raspi-config nonint <command> <arguments> [optional-argument]Note: The meaning of 0 and 1 varies between options. Always check the documentation before passing a value to an option.
System options
Wireless LAN
Configure Wi-Fi SSID and passphrase.
sudo raspi-config nonint do_wifi_ssid_passphrase <ssid> <passphrase> [hidden] [plain]Pass a wireless network name (SSID) and passphrase, if required. The following flags are optional:
The <hidden> option indicates the visibility of the SSID. If the network broadcasts an open SSID, pass 0 or omit the option. If your SSID is hidden, pass 1. Defaults to 0.
The <plain> option indicates whether or not you intend to pass the passphrase as plaintext. If your passphrase includes a space or a special character like !, you must pass 0 and use quotes around your passphrase. Otherwise, you can pass 1 or omit the option. Defaults to 1. To pass this option, you must specify a value for <hidden>.
For example, run the following commands to connect to a:
- non-hidden network named myssid with the passphrase mypassphrase:
sudo raspi-config nonint do_wifi_ssid_passphrase myssid mypassphrase- hidden network named myssid with the passphrase mypassphrase:
sudo raspi-config nonint do_wifi_ssid_passphrase myssid mypassphrase 1- non-hidden network named myssid with the passphrase my passphrase:
sudo raspi-config nonint do_wifi_ssid_passphrase myssid "my passphrase" 0 0Audio
Specify the audio output destination.
sudo raspi-config nonint do_audio <N>On Raspberry Pi 4B, you can use the following options:
- 0: bcm2835 headphone jack
- 1: vc4-HDMI-0
- 2: vc4-HDMI-1
For a full list of possible <N> values, see the numbers used in the interactive raspi-config version of this option.
Password
Change your password. (For more information, see Change a user’s password.)
sudo raspi-config nonint do_change_passNote: This function uses a full-screen interactive interface, even when run from a CLI option.
Hostname
Set the visible mDNS name for this Raspberry Pi on a network.
sudo raspi-config nonint do_hostname <hostname>Boot/auto login
Select whether to boot to the console or desktop and whether or not your Raspberry Pi automatically logs into your current user account when powered on.
sudo raspi-config nonint do_boot_behaviour <B1/B2/B3/B4>- B1: boot to console, requiring login
- B2: boot to console, logging in automatically
- B3: boot to desktop, requiring login
- B4: boot to desktop, logging in automatically
Network at boot
Wait for a network connection before letting the boot proceed.
sudo raspi-config nonint do_boot_wait <0/1>- 0: boot without waiting for network connection
- 1: boot after waiting for network connection
Splash screen
Enable or disable the splash screen displayed at boot time.
sudo raspi-config nonint do_boot_splash <0/1>- 0: enable splash screen
- 1: disable splash screen
Power LED
If your Raspberry Pi model allows, change the behavior of the power LED.
sudo raspi-config nonint do_leds <0/1>- 0: flash for disk activity
- 1: keep the power LED lit at all times
Browser
Change the default web browser. Choosing a web browser that isn’t currently installed won’t work.
sudo raspi-config nonint do_browser <chromium-browser/firefox>Display Options
Underscan
Note: Not available when running Wayland.
If the initial text on the screen disappears off the edge, enable overscan to adjust the border. Disabling overscan on some displays, particularly monitors, will make the picture fill the whole screen and remove the black border.
sudo raspi-config nonint do_overscan_kms <device> <enabled>Device:
- 1: HDMI-1
- 2: HDMI-2
Enabled:
- 0: enable overscan
- 1: disable overscan
Screen blanking
Enable or disable screen blanking.
sudo raspi-config nonint do_blanking <0/1>- 0: enable screen blanking
- 1: disable screen blanking
you can add or edit the following lines to ~/.config/wayfire.ini:
[idle]
dpms_timeout=600
The dpms_timeout variable controls the number of seconds of inactivity required before Raspberry Pi OS blanks your screen. For example, a value of 600 blanks the screen after 600 seconds or ten minutes. Set the value to 0 to never blank the screen.
VNC Resolution
Define the video resolution to use for VNC in headless setups.
sudo raspi-config nonint do_vnc_resolution <width>x<height>Composite
Enable or disable composite video output.
On Raspberry Pi 4:
sudo raspi-config nonint do_pi4video <V1/V2/V3>- V1: enable 4Kp60 HDMI output
- V2: enable composite video output
- V3: disable 4Kp60 and composite output
On other models:
sudo raspi-config nonint do_composite <0/1>- 0: enable composite video
- 1: disable composite video
Interface Options
SSH
Enable or disable remote terminal access to your Raspberry Pi using SSH.
SSH allows you to remotely access the command line of the Raspberry Pi from another computer. For more information about SSH.
sudo raspi-config nonint do_ssh <0/1>- 0: enable SSH
- 1: disable SSH
VNC
Enable or disable a Virtual Network Computing (VNC) server. For more information about VNC, see the VNC documentation.
sudo raspi-config nonint do_vnc <0/1>- 0: enable VNC
- 1: disable VNC
SPI
Enable or disable SPI interfaces and automatic loading of the SPI kernel module.
sudo raspi-config nonint do_spi <0/1>- 0: enable SPI
- 1: disable SPI
I2C
Enable or disable I2C interfaces and automatic loading of the I2C kernel module.
sudo raspi-config nonint do_i2c <0/1>- 0: enable I2C
- 1: disable I2C
Serial Port
Enable or disable the serial connection hardware.
sudo raspi-config nonint do_serial_hw <0/1/2>- 0: enable serial port
- 1: disable serial port
Serial console
Enable or disable shell and kernel messages on the serial connection.
sudo raspi-config nonint do_serial_cons <0/1/2>- 0: enable console over serial port
- 1: disable console over serial port
1-wire
Enable or disable the Dallas 1-wire interface. This is usually used for DS18B20 temperature sensors.
sudo raspi-config nonint do_onewire <0/1>- 0: enable 1-wire
- 1: disable 1-wire
Remote GPIO
Enable or disable remote access to the GPIO pins.
sudo raspi-config nonint do_rgpio <0/1>- 0: enable remote GPIO
- 1: disable remote GPIO
Performance options
Overclock
If your Raspberry Pi model allows, overclock the CPU. Overclocking potential varies between individual Raspberry Pi devices, even within the same model. Overclocking too high may result in instability.
Warning: Overclocking may reduce the lifetime of your Raspberry Pi. If overclocking at a certain level causes system instability, try a more modest overclock. Hold down the Shift key during boot to temporarily disable overclocking.
sudo raspi-config nonint do_overclock <setting>This command accepts the following <setting> values:
- None: no overclock (default)
- Modest: overclock to 50% of the maximum
- Medium: overclock to 75% of the maximum
- High: overclock to 100% of the maximum
- Turbo: overclock to 125% of the maximum
GPU memory
Change the amount of memory made available to the GPU.
sudo raspi-config nonint do_memory_split <megabytes>Overlay file system
Enable or disable a read-only filesystem.
sudo raspi-config nonint do_overlayfs <0/1>- 0: enable overlay filesystem
- 1: disable overlay filesystem
Fan
Customize the behavior of the GPIO-connected Raspberry Pi 4 Case Fan. Does not affect the fans in the Raspberry Pi 5 Case for Raspberry Pi 5 or Raspberry Pi 5 Active Cooler, which connect using a special four-pin fan header.
sudo raspi-config nonint do_fan <0/1> [gpio] [onTemp]- 0: enable fan
- 1: disable fan
gpio defaults to 14.
onTemp defaults to 80 degrees Celsius.
Localisation options
Locale
Select a locale, for example en_GB.UTF-8 UTF-8.
sudo raspi-config nonint do_change_locale <locale>For a full list of possible <locale> values, see the abbreviations used in the interactive raspi-config version of this option.
Time zone
Set your local time zone, starting with the region then selecting a city, e.g. "America/Los Angeles".
sudo raspi-config nonint do_change_timezone <timezone>For a full list of possible <timezone> values, see the abbreviations used in the interactive raspi-config version of this option.
Keyboard
Set your keyboard layout. Changes usually take effect immediately but may require a reboot.
sudo raspi-config nonint do_configure_keyboard <keymap>For a full list of possible <keymap> values, see the abbreviations used in the interactive raspi-config version of this option.
WLAN country
Set the country code for your wireless network.
sudo raspi-config nonint do_wifi_country <country>For a full list of possible <country> values, see the abbreviations used in the interactive raspi-config version of this option.
Advanced options
Expand filesystem
Expand your OS partition to fill the whole storage device, giving you more space to use for files. Reboot the Raspberry Pi to complete this action. Usually, Raspberry Pi OS runs this action on the first boot. This option can be useful if you clone your OS to a separate storage device with more capacity than the original.
Warning: There is no confirmation step. Selecting the option begins the partition expansion immediately.
sudo raspi-config nonint do_expand_rootfsNetwork interface names
Enable or disable predictable network interface names.
sudo raspi-config nonint do_net_names <0/1>- 0: enable predictable network interface names
- 1: disable predictable network interface names
Network proxy settings
Configure the network’s proxy settings.
sudo raspi-config nonint do_proxy <SCHEMES> <ADDRESS>Boot order
On the Raspberry Pi 4 and later, specify whether to boot from USB or network if the SD card isn’t inserted. See the bootloader configuration section for more information.
sudo raspi-config nonint do_boot_order <B1/B2/B3>Depending on your device, you can choose from the following options:
- B1: SD card boot - Boots from SD card if available; otherwise, from NVMe; if neither, from USB.
- B2: NVMe/USB boot - Boots from NVMe if available; otherwise, from USB; if neither, from SD card.
- B3: Network boot - Boots from SD card if inserted; otherwise, from the network.
Bootloader version
On the Raspberry Pi 4 and later, switch to the latest boot ROM software. Alternatively, you can revert to the factory default if the latest version causes problems.
sudo raspi-config nonint do_boot_rom <E1/E2>- E1: use the latest boot ROM
- E2: use the factory default
Wayland
Switch between the X11 and Wayland backends. Raspberry Pi 4 and later use Wayland by default; other models of Raspberry Pi use X11 by default.
sudo raspi-config nonint do_wayland <W1/W2>- W1: use the X11 backend
- W2: use the Wayland backend
Note: To use Wayland on Raspberry Pi models before Raspberry Pi 4, add wayland=on to /boot/firmware/cmdline.txt.
Audio config
Use this option to switch between the PulseAudio and PipeWire audio backends. Before Raspberry Pi OS Bookworm, Raspberry Pi OS used PulseAudio.
sudo raspi-config nonint do_audioconf <1/2>- 1: use the PulseAudio backend
- 2: use the PipeWire backend
Update
Update this tool to the latest version.
sudo raspi-config nonint do_updateStep 5: Decrease Pi 5 Wattage when Turned Off
By default, the Raspberry Pi 5 consumes around 1W to 1.4W of power when turned off. This can be decreased by manually editing the EEPROM configuration with sudo rpi-eeprom-config -e. Change the settings to the following:
BOOT_UART=1
POWER_OFF_ON_HALT=1
BOOT_ORDER=0xf416
Then reboot the device with sudo reboot. This should drop the power consumption when powered down to around 0.01W.
1.2 Update the bootloader
Raspberry Pi 5, Raspberry Pi 4, and Raspberry Pi 400
Raspberry Pi OS automatically updates the bootloader for essential bug fixes. To manually update the bootloader or change the boot order, use raspi-config.
Method 1: Use Raspberry Pi Imager to update the bootloader
Raspberry Pi Imager provides a GUI for updating the bootloader and selecting the boot mode.
- Download Raspberry Pi Imager
- Select a spare SD card (bootloader images overwrite the entire card)
- Launch Raspberry Pi Imager
- Select Choose OS
- Select Misc utility images
- Select Bootloader for your version of Raspberry Pi (Pi 400 is part of the 4 family)
- Select a boot mode: SD (recommended), USB or Network
- Select SD card, and then Write
- Click Yes to continue
- Boot the Raspberry Pi with the new image and wait for at least ten seconds
- When the green activity LED blinks with a steady pattern and the HDMI display shows a green screen, you have successfully written the bootloader
- Power off the Raspberry Pi and remove the SD card
Method 2: Use raspi-config to update the bootloader
To change the boot-mode or bootloader version from within Raspberry Pi OS, run raspi-config.
- Update Raspberry Pi OS to get the latest version of the rpi-eeprom package.
- Run the following command to start raspi-config.
sudo raspi-config - Navigate to Advanced Options and then Bootloader Version. Select Latest and choose Yes to confirm. Select Finish and confirm you want to reboot.
- After the reboot, open a command prompt again and update your system:
sudo apt update - If you run sudo rpi-eeprom-update, you should see that a more recent version of the bootloader is available and it’s the latest release.
sudo rpi-eeprom-update *** UPDATE AVAILABLE *** BOOTLOADER: update available CURRENT: Thu 18 Jan 13:59:23 UTC 2024 (1705586363) LATEST: Mon 22 Jan 10:41:21 UTC 2024 (1705920081) RELEASE: latest (/lib/firmware/raspberrypi/bootloader-2711/latest) Use raspi-config to change the release. VL805_FW: Using bootloader EEPROM VL805: up to date CURRENT: 000138c0 LATEST: 000138c0 - Now, you can update your bootloader.
sudo rpi-eeprom-update -a sudo reboot - Reboot, then run sudo rpi-eeprom-update. You should now see that the CURRENT date has been updated to the latest version of the bootloader:
sudo rpi-eeprom-update

BOOTLOADER: up to date
   CURRENT: Mon 22 Jan 10:41:21 UTC 2024 (1705920081)
    LATEST: Mon 22 Jan 10:41:21 UTC 2024 (1705920081)
   RELEASE: latest (/lib/firmware/raspberrypi/bootloader-2711/latest)
            Use raspi-config to change the release.

  VL805_FW: Using bootloader EEPROM
     VL805: up to date
   CURRENT: 000138c0
    LATEST: 000138c0
1.3 Install DKMS, Update Pi 5 Kernel Firmware and Kernel Headers
Install DKMS
How to Install DKMS on Raspberry Pi 5
1. Introduction
DKMS (Dynamic Kernel Module Support) is a framework developed by Dell that allows dynamic rebuilding of kernel modules whenever the kernel is updated. It helps to avoid manually recompiling modules after every kernel upgrade.
Main Features
- Automatically rebuilds and installs modules when the kernel changes.
- Supports multiple kernel versions simultaneously.
- Commonly used for third-party drivers (e.g., Wi-Fi adapters, GPU drivers, VirtualBox).
2. When Do You Need DKMS?
DKMS is typically needed in the following scenarios on Raspberry Pi 5:
- Installing third-party drivers (e.g., USB Wi-Fi adapters, specific camera drivers, TPU accelerators).
- Frequently updating the kernel (via
rpi-updateor custom kernels). - Using PCIe devices (e.g., Coral Edge TPU, SATA adapters, or network cards).
3. Installation Steps
- Step 1: Update System Packages
sudo apt update && sudo apt upgrade -y - Step 2: Install DKMS
sudo apt install dkms -y - Step 3: Install Kernel Headers and Build Tools
sudo apt install raspberrypi-kernel-headers build-essential -y
Explanation:
raspberrypi-kernel-headers: Kernel headers matching your current Pi kernel.build-essential: Compilation tools likegccandmake.
4. DKMS Workflow Basics
# Add a module
dkms add -m <module_name> -v <version>

# Build the module
dkms build -m <module_name> -v <version>

# Install the module
dkms install -m <module_name> -v <version>

# Check status
dkms status
5. Verify Installation
dkms --versionYou should see an output similar to:
2.8.4Check registered modules:
dkms statusIf no modules are installed, it will show empty or no modules installed.
6. Example: Installing a Wi-Fi Driver with DKMS
Example using rtl8821ce driver:
git clone https://github.com/tomaspinho/rtl8821ce.git
cd rtl8821ce
sudo dkms add .
sudo dkms build rtl8821ce/1.0.5
sudo dkms install rtl8821ce/1.0.5
Check installation status:
dkms status
Expected output:
rtl8821ce, 1.0.5, 6.6.20-v8+, aarch64: installed7. Reboot and Check Module
sudo reboot
lsmod | grep rtl8821ce
8. Common Issues
- Missing kernel headers: Check your kernel version:
Make sureuname -rraspberrypi-kernel-headersmatches your kernel version. - Build errors: May indicate missing dependencies or an unsupported ARM architecture. Check the driver’s README.
Update Pi 5 Kernel Firmware and Install Kernel Headers (Optional)
Update Pi 5 Kernel Firmware and Install Kernel Headers
Updating your Raspberry Pi 5 to the latest Kernel and installing the appropriate Kernel headers gives you access to pre-release features. This tutorial will guide you through using rpi-update to update the kernel and rpi-source to install the kernel header files.
Upgrade Kernel Firmware
To check the kernel firmware version, run the following command:
uname -a
Linux pi5 6.6.62+rpt-rpi-v8 #1 SMP PREEMPT Debian 1:6.6.62-1+rpt1 (2024-11-25) aarch64 GNU/Linux
If the version ends with v8, the firmware typically does not require an update. However, if it ends with v8+, you may need to downgrade the kernel firmware to install the Coral Edge TPU driver later.
Pre-release versions of the software are not guaranteed to work. Do not use rpi-update on any system unless recommended by a Raspberry Pi engineer to do so. It could leave your system unreliable or broken. Do not use rpi-update as part of any regular update process.
Step 1: Update the System
Run the following commands to ensure your system is up to date:
sudo apt update
sudo apt full-upgrade
Step 2: Install rpi-update
sudo apt install rpi-update
Step 3: Update the Kernel
Run rpi-update as root to initiate the update. Once the update is complete, reboot your Raspberry Pi for these changes to take effect:
sudo rpi-update
sudo rm /boot/firmware/.firmware_revision
sudo rm /boot/firmware/.bootloader_revision
sudo reboot
Downgrade Firmware to the Last Stable Release
Downgrade Firmware to the Last Stable Release
If you update your firmware to the latest release and experience an issue, use the following command to return to the last stable firmware release:
sudo apt-get update
sudo apt install --reinstall raspi-firmware
sudo reboot
Install Kernel Headers
Kernel headers are needed if you plan to build modules or drivers. rpi-source command is a tool that helps fetch the source corresponding to the installed kernel.
Step 1: Install rpi-source to Fetch Kernel Headers
Install necessary tools and rpi-source:
sudo apt install git bc bison flex libssl-dev make libncurses5-dev
sudo wget https://raw.githubusercontent.com/jgartrel/rpi-source/master/rpi-source -O /usr/bin/rpi-source
sudo chmod +x /usr/bin/rpi-source
rpi-source --tag-update
Step 2: Fetch the Kernel Headers
Download and prepare the kernel headers:
rpi-source --default-config
This command fetches the kernel source and ensures that the kernel headers align correctly with your currently running kernel.
1.4 Configure PCIe Connect

Raspberry Pi 5 has an FPC connector on the right-hand side of the board. This connector breaks out a PCIe Gen 2.0 ×1 interface for fast peripherals.
To connect a PCIe HAT device, connect it to your Raspberry Pi. Your Raspberry Pi should automatically detect the device. To connect a non-HAT+ device, connect it to your Raspberry Pi, then manually enable PCIe.
Enable PCIe
By default, the PCIe connector is not enabled. To enable it, you should add the following option into /boot/firmware/config.txt and reboot:
sudo nano /boot/firmware/config.txt
Then add the following comment;
# Enable the PCIe External connector.
dtparam=pciex1

# This line is an alias for above (you can use either/or to enable the port).
dtparam=nvme
PCIe Gen 3.0
The connection is certified for Gen 2.0 speed (5 GT/sec), but you can force it to Gen 3.0 (10 GT/sec)
Method 1: via config.txt
via config.txt
To enable PCIe Gen 3.0 speeds, add the following line to /boot/firmware/config.txt.
# Enable PCIe Gen 3.0 speeds
dtparam=pciex1_gen=3
Reboot your Raspberry Pi with sudo reboot for these settings to take effect.
Method 2: via raspi-config
via raspi-config
Run the following command to open the Raspberry Pi Configuration CLI:
sudo raspi-config
Complete the following steps to enable PCIe Gen 3.0 speeds:
- Select Advanced Options.
- Select PCIe Speed.
- Choose Yes to enable PCIe Gen 3 mode.
- Select Finish to exit.
Reboot your Raspberry Pi with sudo reboot for these settings to take effect.
After reboot, use the lspci command to display your PCIe devices
sudo lspci
0000:00:00.0 PCI bridge: Broadcom Inc. and subsidiaries Device 2712 (rev 21)
0000:01:00.0 Non-Volatile memory controller: Silicon Motion, Inc. SM2263EN/SM2263XT SSD Controller (rev 03)
0001:00:00.0 PCI bridge: Broadcom Inc. and subsidiaries Device 2712 (rev 21)
0001:01:00.0 Ethernet controller: Device 1de4:0001
WARNING: The Raspberry Pi 5 is not certified for Gen 3.0 speeds, and connections to PCIe devices at these speeds may be unstable.
Monitoring PCIe Gen Speeds on Raspberry Pi 5
On Linux (including Raspberry Pi OS on the Pi 5), PCIe link speed is exposed both via lspci (part of the pciutils package) and in sysfs. To watch it in (near) real time, you can:
- Identify your PCIe device’s bus address
Look for the entry corresponding to the onboard PCIe port (e.g. an NVMe adapter or USB4 controller). You will see something like:lspci
Here 06:00.0 is the bus:device.function address0001:06:00.0 Non-Volatile memory controller: Micron Technology Inc 2550 NVMe SSD (DRAM-less) (rev 01) - Check the current link speed once
That gives you two lines:sudo lspci -s 06:00.0 -vv | grep -E "LnkSta:|LnkCap:"- LnkCap: the maximum supported speed/width (e.g., “Port #0, Speed 5GT/s, Width x1”)
- LnkSta: the current negotiated speed/width (e.g. “Speed 5GT/s, Width x1”)
- Monitor in real time with watch command:
This reruns the command every second so you can see if the link drops to Gen1 (2.5 GT/s) under load or negotiates up to Gen2 (5 GT/s).sudo watch -n 1 "lspci -s 06:00.0 -vv | grep LnkSta"
Alternative: read directly from sysfs
Every PCI device has a current_link_speed file under /sys. For example, if your device is at 0001:06:00.0:
# Find the right path (you may need to adjust the PCI address)
cd /sys/bus/pci/devices/0001:06:00.0
# Check current speed
cat current_link_speed
# Check current width
cat current_link_width
You can also watch those:
watch -n 1 'cat /sys/bus/pci/devices/0001:06:00.0/current_link_speed /sys/bus/pci/devices/0001:06:00.0/current_link_width'
Notes
- On the Pi 5, the onboard PCIe port is a single-lane Gen2 link (up to 5 GT/s).
- You will need sudo (or root) to read the verbose PCIe status.
- If you see Speed 2.5GT/s, that means it has fallen back to Gen1 — often due to signal integrity or power-management events.
With these commands, you can keep an eye on your Pi 5’s PCIe performance in real time.
1.5 SSD Installation on Pi5
NVMe (Non-Volatile Memory Express) is a standard for external storage access over a PCIe bus. You can connect NVMe drives via the PCIe slot on a Compute Module 4 (CM4) IO board or Raspberry Pi 5. With some additional configuration, you can boot from an NVMe drive.
SSD Installation and Mounting
SSD Installation
You must mount an M.2 HAT adapter on the Pi 5 board and connect a ribbon cable to the Pi 5 CM4 port. Complete the following instructions to install the M.2 HAT adapter:
- First, ensure that your Pi 5 runs the latest software. Run the following command to update:
sudo apt update && sudo apt full-upgrade - Next, ensure your Raspberry Pi firmware bootloader is up-to-date [1.2 Update the bootloader]. Run the following command to see what firmware you’re running:
sudo rpi-eeprom-update - Enable PCIe and PCIe Gen 3 support
- Shut down the system.
sudo shutdown -P now - Disconnect the Raspberry Pi from power before beginning installation.
- Install M.2 HAT on the Raspberry Pi 5 and mount the PCIe SSD card.
To check that your NVMe drive is connected correctly, boot your Raspberry Pi from another storage device (such as an SD card) and run the following command:
sudo lspci
0000:00:00.0 PCI bridge: Broadcom Inc. and subsidiaries BCM2712 PCIe Bridge (rev 21)
0000:03:00.0 Non-Volatile memory controller: Samsung Electronics Co Ltd NVMe SSD Controller PM9A1/PM9A3/980PRO
0001:00:00.0 PCI bridge: Broadcom Inc. and subsidiaries BCM2712 PCIe Bridge (rev 21)
0001:01:00.0 Ethernet controller: Raspberry Pi Ltd RP1 PCIe 2.0 South Bridge
If your NVMe SSD is not recognized, updating the bootloader firmware is essential! Refer to [1.2 Update the bootloader] to know more details.
Format SSD and Create a Mount Point
- Identify the NVMe SSD:
Find the SSD device name using lsblk command.
The output should look like the following:
In this case, the SSD name is nvme0n1.lsblk NAME MAJ:MIN RM SIZE RO TYPE MOUNTPOINTS mmcblk0 179:0 0 119.1G 0 disk ├─mmcblk0p1 179:1 0 512M 0 part /boot/firmware └─mmcblk0p2 179:2 0 118.6G 0 part / nvme0n1 259:0 0 238.5G 0 disk - Partition of the SSD (Optional):
If you want to partition your SSD before formatting, you can use a tool like fdisk or parted. You can skip this step if you are formatting the entire SSD as a single partition.
To partition the SSD using fdisk, follow these steps:
Run fdisk on your NVMe SSD (replace /dev/nvme0n1 with your SSD's device name):
Inside fdisk, you can create a new partition table and partitions by following the prompts. Typically, you would:sudo fdisk /dev/nvme0n1- Press n to create a new partition.
- Press p for a primary partition.
- Choose the partition number (usually 1 for the first partition).
- Accept the default values for the first and last sectors to use the full disk.
- Press w to write the partition table and exit.
- Format the SSD:
Once the SSD is partitioned, or if you're using it as a single unpartitioned device, you can format it with your desired file system. A common choice is ext4.
To format the entire SSD with ext4, run the following command (replace /dev/nvme0n1 with your specific partition name, for example, /dev/nvme0n1p1):
If you have multiple partitions, you must format each partition individually by replacing nvme0n1 with the appropriate partition number (for example, nvme0n1p1, nvme0n1p1 ...).sudo mkfs.ext4 /dev/nvme0n1 - Mount the SSD:
Create and mount the directory:sudo mkdir /ssd sudo mount /dev/nvme0n1 /ssd - Verify the SSD is Mounted:
You can verify that the SSD is mounted correctly by running:
This command should list your NVMe SSD and its mount point, confirming that it is ready for use.df -h
Write Speed Test on SSD
Test PCIe Gen 3 Speed on SSD
Change to SSD folder, then run the following command on the Terminal window to test:
cd /ssd
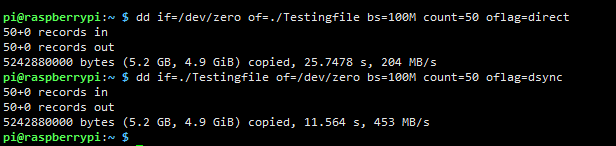
dd if=/dev/zero of=./Testingfile bs=100M count=10 oflag=direct
dd if=./Testingfile of=/dev/zero bs=100M count=10 oflag=dsync
Normal PCIE 2.0 test data with dd command
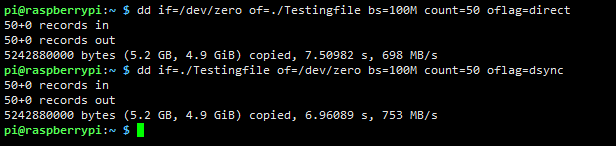
Forced Gen 3.0 speeds test data with dd command:
Configure Auto-Mount SSD on Boot
Add the SSD to fstab to ensure it auto-mounts on boot.
Method 1: Mount UUID
- First, identify the UUID for your SSD:
Write the UUID value under nvme0n1.lsblk -f - Then, add a new entry to the fstab file:
sudo nano /etc/fstab - Insert the following line, replacing the UUID with the value found from lsblk -f:
UUID=************-****-****-****-******** /ssd/ ext4 defaults 0 2 - Finally, change the ownership of the /ssd directory.
sudo chown ${USER}:${USER} /ssd
Method 2: Mount /dev
To ensure the SSD is automatically mounted on boot, you can edit the /etc/fstab file:
- Open the file with a text editor:
sudo nano /etc/fstab - Add a line for your NVMe SSD. For example:
Save and exit./dev/nvme0n1 /ssd ext4 defaults 0 2 - Finally, change the ownership of the /ssd directory.
sudo chown ${USER}:${USER} /ssd
Boot from SSD
To boot your Raspberry Pi 5 from an NVMe SSD, follow these steps:
Boot from NVMe SSD
By default, Raspberry Pi devices do not boot from PCIe storage. To enable boot from PCIe, change the BOOT_ORDER in the bootloader configuration. Edit the EEPROM configuration with the following command:
sudo rpi-eeprom-config --edit
Replace the BOOT_ORDER line with the following line:
BOOT_ORDER=0xf416
To boot from a non-HAT+ device, also add the following line:
PCIE_PROBE=1
After saving your changes, reboot your Raspberry Pi with sudo reboot to update the EEPROM.
Important Notes:
- Only Raspberry Pi OS (Bookworm) is supported.
- Ensure the bootloader is updated and the boot order is set correctly.
- If cloning an existing OS that already has PCIe enabled, you don't need to enable PCIe again.
Flash Pi OS onto NVMe SSD
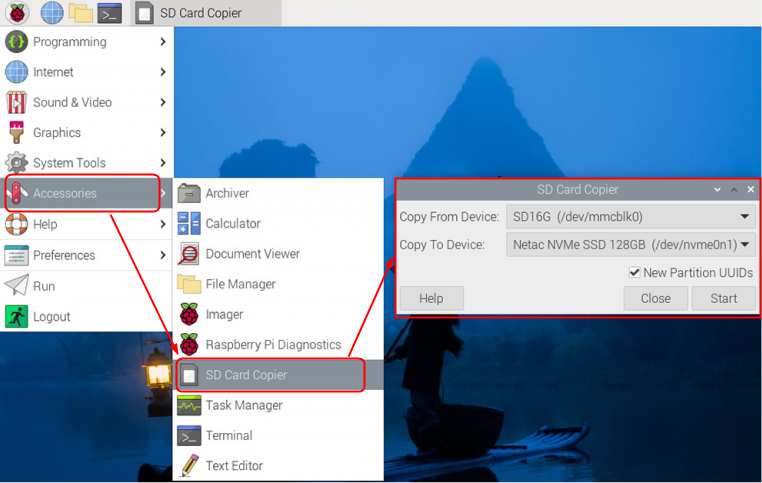
Method 1: Use SD Card Copier Tool
This method works if you have an SD card and have booted the device successfully.
- Boot from SD Card: Ensure your Raspberry Pi 5 is booted from an SD card with Raspberry Pi OS.
- Open SD Card Copier: Go to Applications -> Accessories -> SD Card Copier.

- Copy OS to SSD: Use the SD Card Copier to clone your OS from the SD card to the NVMe SSD.
- Shut Down: After copying, shut down the Raspberry Pi, remove the SD card, and restart the device.
Method 2: Use Raspberry Pi Imager
- Prepare Tools: Install Raspberry Pi Imager on a Mac or Windows computer and have a USB to NVMe adapter ready.
- Flash OS: Use Raspberry Pi Imager to flash Raspberry Pi OS (Bookworm) onto the NVMe SSD.
- Enable PCIe: If flashing a fresh OS, enable PCIe as described earlier.
- Boot from SSD: Insert the NVMe SSD into your Raspberry Pi 5 and boot.
SSD TRIM Supported
What is SSD Trim?
TRIM is a command in computing that helps Solid State Drives (SSDs) manage and optimize their storage. When you delete a file on an SSD, the file isn’t immediately erased from the storage cells. Instead, the space is marked as available, but the data remains until the SSD needs to overwrite it. This is different from how traditional Hard Disk Drives (HDDs) operate, where data can be overwritten directly.
TRIM tells the SSD which data blocks are no longer in use (because they've been deleted) so it can wipe those blocks and prepare them for future writes. This process helps maintain the SSD’s speed and efficiency over time.
Importance of the TRIM Function
- Performance Maintenance:
- Without TRIM, an SSD would slow down over time as it would have to perform additional steps to overwrite data in blocks that still contain old information. TRIM helps avoid this by preemptively clearing unused blocks, allowing the SSD to maintain optimal performance.
- Longevity:
- TRIM reduces the number of write operations to the SSD, which is crucial because SSDs have limited write cycles. By efficiently managing when data is erased, TRIM helps extend the lifespan of the SSD.
- Efficient Use of Space:
- With TRIM, the SSD can manage its storage space more efficiently, ensuring that deleted files don't unnecessarily occupy space, leading to more effective use of the available storage.
- Wear Leveling:
- SSDs use wear leveling to ensure that all memory cells are used evenly, preventing some cells from wearing out prematurely. TRIM contributes to this by providing the SSD with accurate information about which cells need to be cleared, aiding in better wear leveling.
TRIM is essential for maintaining the performance, efficiency, and lifespan of SSDs. Without it, SSDs would slow down over time and could wear out faster due to inefficient management of data. Therefore, enabling TRIM (if not already enabled by default) is highly recommended for any system using SSDs.
Enable Trim on a Raspberry Pi
Enabling TRIM on a Raspberry Pi 5 involves ensuring that your SSD supports TRIM and that the operating system is configured to use it. Here’s a step-by-step guide to enabling TRIM on a Raspberry Pi 5:
Step 1: Ensure Your SSD Supports TRIM
Before proceeding, make sure that your SSD supports the TRIM command. Most modern SSDs do, but it’s always good to confirm by checking the manufacturer's specifications.
- Find out whether your device already supports TRIM commands.
Non-zero values in the DISC-GRAN and DISC-MAX indicate that the devices support TRIM. If the DISC-MAX value is 0B, then TRIM is not enabled.lsblk --discard NAME DISC-ALN DISC-GRAN DISC-MAX DISC-ZERO mmcblk0 0 4M 158.8G 0 ├─mmcblk0p1 0 4M 158.8G 0 └─mmcblk0p2 0 4M 158.8G 0 nvme0n1 0 512B 2T 0
Step 2: Verify the File System
TRIM is typically supported on file systems like ext4. If your Raspberry Pi uses a different file system, you may need to reformat or choose an appropriate one that supports TRIM.
lsblk -f
NAME        FSTYPE FSVER LABEL  UUID                                 FSAVAIL FSUSE% MOUNTPOINTS
mmcblk0
├─mmcblk0p1 vfat   FAT32 bootfs 9BE2-1346                             434.9M    15% /boot/firmware
└─mmcblk0p2 ext4   1.0   rootfs 12345678-889e-4060-b497-123456789012  102.7G     7% /
nvme0n1     ext4   1.0          9abcdef0-9cf5-46d5-8ef2-123456789012  868.3G     0% /ssd
Step 3: Update Your System
Make sure your Raspberry Pi’s operating system is up-to-date to ensure you have the latest features and bug fixes.
sudo apt-get update
sudo apt-get upgrade
Step 4: Check If TRIM is Already Enabled
- You can check if TRIM is enabled by running the following command:
If TRIM is enabled, you should see output similar to the above output.sudo fstrim -v /ssd /ssd: 915.8 GiB (983351111680 bytes) trimmed - Alternatively, you can create a Python script to check the TRIM status: (Reference: https://github.com/muhkuh-sys/raspberry_enable_trim)
- Create a new Python file:
nano trim.py - Add the following code to the trim.py file:
- Save the file and then run the following command to check TRIM on your device (replace nvme0n1 with your device name):
sudo python3 trim.py nvme0n1 TRIM is enabled for nvme0n1.- If TRIM is enabled, the script will output "TRIM is enabled".
- If you encounter the error message "The required command sg_vpd was not found in the path," you must install the sg3-utils package. Use the following command to do so:
sudo apt-get install sg3-utils
- Create a new Python file:
Step 5: Enable TRIM (If Not Already Enabled)
Method 1: Auto TRIM
Auto TRIM automatically trims the SSD whenever files are deleted. This is done by enabling the discard option in the file system's mount options.
- Edit the Fstab File:
You may need to ensure the discard option is in the /etc/fstab file for your SSD. Open the file with a text editor:sudo nano /etc/fstab
- Modify the SSD Mount Options:
Find the line that mounts your SSD and add discard to the mount options. It might look something like this:
orUUID=xxxxxxxx-xxxx-xxxx-xxxx-xxxxxxxxxxxx /ssd/ ext4 defaults,discard 0 2
This tells the system to use TRIM on the SSD automatically./dev/nvme0n1 /ssd ext4 defaults,discard 0 2 - Save the file, then reboot the System:
Reboot your Raspberry Pi to apply the changes:sudo reboot - Verify TRIM is Working
After rebooting, you can verify that TRIM is working by running:
This command should report the amount of data trimmed, confirming that TRIM is active.sudo fstrim -v /ssd
Method 2: Scheduled TRIM
Scheduled TRIM is performed periodically, such as once a week, using a cron job. This method is useful if you want to avoid the potential performance impact of auto TRIM.
- Create a cron job:
You can set up a cron job to run fstrim periodically, such as once weekly.sudo crontab -e - Add the following line to schedule TRIM weekly:
@weekly /sbin/fstrim -v /ssd - Save the file, then reboot the System:
Reboot your Raspberry Pi to apply the changes:sudo reboot - Verify TRIM is working
After rebooting, you can verify that TRIM is working by running:
This command should report the amount of data trimmed, confirming that TRIM is active.sudo fstrim -v /ssd
Troubleshooting NVMe SSD Detection Issues on Raspberry Pi 5
When using an NVMe SSD on the Raspberry Pi 5 via a PCIe extension HAT, you may find the drive inaccessible or reporting a size of 0 B. This guide helps you understand why the controller fails to initialize and walks you through the necessary kernel parameter adjustments and verification steps to restore full SSD functionality..
- Problem Description
- Symptom 1: With the SSD plugged into a PCIe extension HAT (especially if another PCIe card is also attached), the SSD disappears, or lsblk shows it as 0 B.
- Symptom 2: sudo nvme list returns no namespaces.
- Symptom 3: Kernel logs reveal repeated controller resets, I/O errors, and power-state failures.
Example outputs:
lsblk
NAME      MAJ:MIN RM   SIZE RO TYPE MOUNTPOINTS
mmcblk0   179:0    0 238.3G  0 disk
├─mmcblk0p1 179:1  0   512M  0 part /boot/firmware
└─mmcblk0p2 179:2  0 237.8G  0 part /
nvme0n1   259:0    0     0B  0 disk

sudo nvme list
No entries shown

dmesg | grep -i nvme
… nvme nvme0: min host memory (64 MiB) above limit (0 MiB).
… nvme nvme0: resetting controller due to persistent internal error
… Identify namespace failed (-4)
… Unable to change power state from D3cold to D0, device inaccessible
… Disabling device after reset failure: -19
- Root Causes
- Insufficient Host Memory Buffer
- The kernel parameter nvme.max_host_mem_size_mb=0 restricts the NVMe driver to 0 MiB of host RAM for I/O queues, but it needs at least 64 MiB.
- Faulty Power-Saving Transitions
- By default, the Pi 5’s NVMe driver and PCIe link use ASPM (Active State Power Management) and power-saving modes that some SSDs handle poorly, causing the controller to drop into D3cold and fail to resume.
- Insufficient Host Memory Buffer
- Solution Steps
- Edit Kernel Command Line
sudo nano /boot/firmware/cmdline.txt- Remove any instance of nvme.max_host_mem_size_mb=0.
- Add or set at least nvme.max_host_mem_size_mb=64.
- Append the following to disable problematic ASPM and power-save features:
nvme_core.default_ps_max_latency_us=0 pcie_aspm=off pcie_port_pm=off - Ensure the entire file remains one continuous line of space-separated parameters.
- Update Firmware and Kernel
sudo apt update sudo apt full-upgrade # (Optional) sudo rpi-update - Reboot
sudo reboot
- Edit Kernel Command Line
- Verification
- Confirm Kernel Parameters
cat /proc/cmdline # → Should include: nvme.max_host_mem_size_mb=64 nvme_core.default_ps_max_latency_us=0 pcie_aspm=off pcie_port_pm=off - Check dmesg for NVMe Initialization
dmesg | grep -i nvme- Good signs:
- Allocated 64 MiB host memory buffer
- nvme0: 4/0/0 default/read/poll queues
- No longer present:
- min host memory (64 MiB) above limit (0 MiB)
- Power-state errors (D3cold, controller is down)
- Good signs:
- Verify SSD Capacity and Functionality
lsblk # → nvme0n1 should now show its true size (e.g. 500G) sudo nvme list # → Shows namespace, capacity, format, firmware version - Partition and Format (if required)
sudo parted -s /dev/nvme0n1 mklabel gpt
sudo parted -s /dev/nvme0n1 mkpart primary 0% 100%
sudo mkfs.ext4 -L data /dev/nvme0n1p1
sudo mkdir -p /ssd
sudo mount /dev/nvme0n1p1 /ssd
- Confirm Kernel Parameters
By increasing the host memory buffer and disabling problematic power-saving modes, the Pi 5’s NVMe controller can initialize reliably even when sharing the PCIe extension HAT with another device.
1.6 Real Time Clock (RTC) on Pi 5

Add a Rechargeable Backup Battery
The Raspberry Pi 5 has an integrated Real-Time Clock (RTC) module that can be powered via the J5 (BAT) connector, located near the USB-C power connector. To maintain time when powered off, connect a rechargeable lithium-manganese coin cell battery to the two-pin JST-SH plug, like the ML2020 from Adafruit.

ML2020 Manganese Rechargeable Lithium Battery
Battery Recommendations
- Rechargeable Battery: Use a rechargeable lithium manganese coin cell.
- Non-Rechargeable Batteries: Not recommended due to higher current consumption.
- Lithium-Ion Cells: Do not use for RTC.
Check RTC Device Availability
Run the following command:
ls /sys/class/rtcIf RTC is enabled, you should see rtc0 listed.
Read the current RTC Time
Execute:
sudo hwclock --showThis should display the current time stored in the RTC.
Check RTC Kernel Logs
Run
dmesg | grep rtcThis will show any system messages related to the RTC module.
Enable RTC in the Bootloader Configuration
Modify the bootloader configuration to enable wake alarms and low-power mode:
sudo rpi-eeprom-config --editAdd the following lines:
POWER_OFF_ON_HALT=1
WAKE_ON_GPIO=0
Save and exit
Test RTC Wake Alarm
To test the wake alarm functionality, run:
echo +600 | sudo tee /sys/class/rtc/rtc0/wakealarm
sudo halt
This sets the Raspberry Pi 5 to wake up after 10 minutes.
Enable Battery Charging
- Charger Specs: The RTC includes a constant-current (3mA) constant-voltage charger.
- Default Settings: Charging of the battery is disabled by default. There are sysfs files that show the charging voltage and limits:
/sys/class/rtc/rtc0/charging_voltage:0 /sys/class/rtc/rtc0/charging_voltage_max:4400000 /sys/class/rtc/rtc0/charging_voltage_min:1300000 - Set Charging Voltage: By default, trickle charging for the RTC battery is disabled. To enable it, add the following line to /boot/firmware/config.txt:
dtparam=rtc_bbat_vchg=3000000 - Reboot: Apply the changes with:
sudo reboot - Verify Settings: Check the sysfs files to ensure the correct charging voltage:
cat /sys/class/rtc/rtc0/charging_voltage
1.7 Setup Camera Module
Step 1: Connect the Camera to the Raspberry Pi 5
- Locate the Camera Ports:
The Raspberry Pi 5 has two camera ports labeled CAM0 and CAM1. These are MIPI Camera Serial Interface (CSI) connectors near the HDMI and Ethernet ports.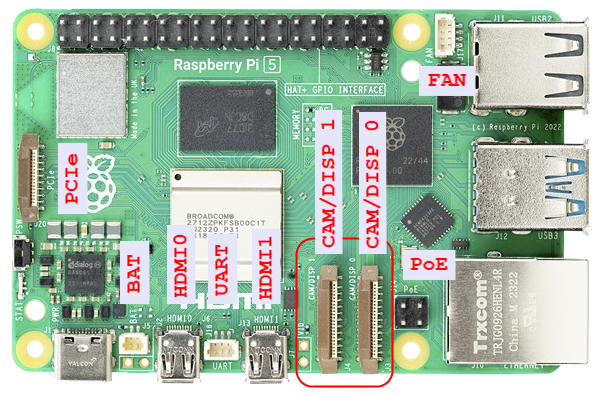
- Insert the Ribbon Cable:
- Lift the retaining clip on your chosen camera port (CAM0 or CAM1).
- Insert the ribbon cable into the connector with the metal contacts facing the HDMI port.
- Push the retaining clip back into place to secure the ribbon cable.
Step 2: Install the Camera Software
The Raspberry Pi 5 uses the libcamera library for camera functionality.
- Install the libcamera applications:
sudo apt install libcamera-apps -y - Verify the installation:
libcamera-hello- This command opens a preview window from the connected camera.
- If the camera is working, you will see a live video feed.
Step 3: Configure the Camera (Optional)
If you are using a third-party camera module or need advanced configurations:
- Open the configuration file:
sudo nano /boot/firmware/config.txt - Disable automatic camera detection:
camera_auto_detect=0 - Add the appropriate device tree overlay for your camera module:
- For CAM0:
dtoverlay=<camera_name>,mipi_port=0; - For CAM1:
Replace <camera_name> with the specific driver for your camera (e.g., imx219).dtoverlay=<camera_name>,mipi_port=1;
- For CAM0:
- Save and exit:
- Press Ctrl + X, then Y, and Enter.
- Reboot the system:
sudo reboot
Raspberry Pi AI Camera

The AI Camera uses the Sony IMX500 sensor to run neural-network inference right on the sensor, delivering low-latency, high-performance AI and integrating seamlessly with the Raspberry Pi camera software stack, so you can easily deploy custom models.
- Hardware Connection
- With the Pi powered off, unlock the two plastic latches on the AI Camera module and insert the wider end of the ribbon cable (the side with the exposed "teeth") into the module's socket, then lock the latches.
- Still powered off, unlock the CSI connector on the Pi board (labelled "CAM1" on a Pi 4 or "CAMERA" on a Pi 5).
- Insert the other end of the ribbon cable into the Pi's CSI slot with the metal contacts facing the USB/Ethernet ports, ensuring it is straight and un-twisted, then lock the latch. Power the Pi back on.
- System Update & Driver Installation
- Open a terminal and update your system.
sudo apt update && sudo apt full-upgrade - Install the AI Camera packages (including the IMX500 firmware, pre-trained models, and updated rpicam-apps):
sudo apt install imx500-all - Reboot to load the new drivers:
sudo reboot
- Open a terminal and update your system.
- Running the Built-In Examples with rpicam-apps
- Object Detection
Point objects or gestures at the camera, and you’ll see bounding boxes and labels in the preview window.rpicam-hello -t 0s --post-process-file /usr/share/rpi-camera-assets/imx500_mobilenet_ssd.json - Pose Estimation
Move in front of the camera to see a stick-figure skeleton overlay.rpicam-hello -t 0s --post-process-file /usr/share/rpi-camera-assets/imx500_posenet.json - Recording Video with Overlays
Records a 10-second video with detection boxes and labels.rpicam-vid -t 10s -o output.mp4 --post-process-file /usr/share/rpi-camera-assets/imx500_mobilenet_ssd.json
- Object Detection
- Controlling the AI Camera in Python (Picamera2)
- Install the Python camera and image-processing packages:
sudo apt update && sudo apt install python3-opencv python3-munkres - Clone the Picamera2 examples and navigate to the IMX500 folder:
git clone https://github.com/raspberrypi/picamera2.git cd picamera2/examples/imx500 - Run the object-detection demo:
python imx500_object_detection_demo.py - Run the higher-HRNet pose estimation demo:
python imx500_pose_estimation_higherhrnet_demo.py
- Install the Python camera and image-processing packages:
Freenove Cameras
Freenove Camera

Freenove offers two types of cameras that are compatible with Raspberry Pi devices:
| Product SKU | Specification | Camera Chip | Work with Raspberry Pi | Work with Jetson Nano |
|---|---|---|---|---|
| FNK0056 | 5MP 62º Angle | OV5647 | YES | NO |
| FNK0056 B | 8MP 120º Angle | IMX219 | YES | YES |
For the camera to function correctly, you must modify the Raspberry Pi's configuration file to load the appropriate camera driver.
Here, use the IMX219 camera as an example:
- Open the Configuration File:
Use the following command to edit the configuration file:sudo nano /etc/firmware/config.txt - Disable Automatic Camera Detection:
Locate the camera_auto_detect setting and change its value to 0:camera_auto_detect=0 - Add Camera Driver Overlay:
Scroll to the bottom of the file and add the appropriate overlay based on your Raspberry Pi model:
- For Raspberry Pi 5
dtoverlay=imx219,cam0 - For Raspberry Pi 3/4
dtoverlay=imx219
- If you use the OV5647 camera, replace imx219 with ov5647 in the overlay.
- If your camera is connected to the CAM1 port instead of CAM0 on the Raspberry Pi 5, update the overlay to:
dtoverlay=imx219,cam1
- For Raspberry Pi 5
- Save and Exit:
Save the changes by pressing Ctrl+X, then Y, and Enter. - Reboot the Raspberry Pi:
Apply the changes by rebooting:sudo reboot
Resources
- Freenove web site: https://freenove.com/
- Tutorial: https://freenove.com/tutorial
- FNK0056/B Camera: https://store.freenove.com/products/fnk0056
- Github: https://github.com/Freenove/Freenove_Camera_Module_for_Raspberry_Pi
Step 4: Testing the Camera
- Before testing the camera, run the following command to see if the camera can be detected:
libcamera-hello --list-cameras - Check Camera Connection:
sudo ls /dev/video*
/dev/video0   /dev/video2   /dev/video22
/dev/video1   /dev/video20  /dev/video23
Look for /dev/video0. If not present, recheck the camera connection.
- You can check that libcamera is working by opening a command window and typing:
You should see a camera preview window for about five seconds. If you do not, please refer to the Raspberry Pi camera documentation.libcamera-hello - You can also enter the following command to capture an image with a resolution of 800 by 600. The image is saved in the current directory path by default.
libcamera-jpeg –o test.jpg –t 2000 –width 800 –height 600
Step 5: Control the Camera with Python
Capture Images with Python
- Create a Python script:
nano camera.py - Add the following code:
from picamera2 import Picamera2, Preview import time picam2 = Picamera2() camera_config = picam2.create_preview_configuration() picam2.configure(camera_config) picam2.start_preview(Preview.QTGL) picam2.start() time.sleep(2) picam2.capture_file("test.jpg") picam2.close() - Run the script:
python camera.py
Capture videos
- Create a Python script:
nano camera_transform.py - Add the following code:
from picamera2 import Picamera2, Preview
from libcamera import Transform
picam2 = Picamera2()
picam2.start_preview(Preview.QTGL, x=100, y=200, width=800, height=600, transform=Transform(hflip=1))
picam2.start()
Record in H.264 Format
- Create a Python script:
nano camera_h264.py - Add the following code:
from picamera2.encoders import H264Encoder
from picamera2 import Picamera2
import time
picam2 = Picamera2()
video_config = picam2.create_video_configuration()
picam2.configure(video_config)
encoder = H264Encoder(bitrate=10000000)
output = "test.h264"
picam2.start_recording(encoder, output)
time.sleep(10)
picam2.stop_recording()
Test Video Quality
- Create a Python script:
nano camera_quality.py - Add the following code:
import time
from picamera2.encoders import H264Encoder, Quality
from picamera2 import Picamera2
picam2 = Picamera2()
video_config = picam2.create_video_configuration()
picam2.configure(video_config)
encoder = H264Encoder()

picam2.start_recording(encoder, 'low.h264', quality=Quality.VERY_LOW)
print(encoder._bitrate)
time.sleep(5)
picam2.stop_recording()

picam2.start_recording(encoder, 'medium.h264', quality=Quality.MEDIUM)
print(encoder._bitrate)
time.sleep(5)
picam2.stop_recording()

picam2.start_recording(encoder, 'high.h264', quality=Quality.VERY_HIGH)
print(encoder._bitrate)
time.sleep(5)
picam2.stop_recording()
1.8 Python Virtual Environment on Raspberry Pi
Raspberry Pi OS includes Python 3 by default. Modifying the system's Python installation can lead to operating system issues. To install third-party Python libraries, always use the appropriate package management tools.
On Linux, you can install Python dependencies through two methods:
- apt: For pre-configured system packages.
- pip: For libraries installed via Python’s dependency manager within a virtual environment.
With Raspberry Pi OS Bookworm, pip installations are restricted to Python virtual environments (venv). Virtual environments provide an isolated container for installing third-party modules, ensuring they don’t interfere with the Python system.
Using a Python Virtual Environment (venv) isolates Python dependencies for different projects. This is especially useful on a Raspberry Pi, where you may experiment with various libraries that might conflict.
Steps to Set Up and Use Python Virtual Environment on Raspberry Pi
Steps to Set Up and Use Python Virtual Environment on Raspberry Pi
- Ensure Python is Installed:
Python 3 comes pre-installed on Raspberry Pi OS. Verify it:python3 --version - Install venv Module
Ensure the venv module is installed:sudo apt update sudo apt install python3-venv -y - Create a Virtual Environment:
Navigate to your project directory or create one:
Create a virtual environment named env:mkdir MyProject cd MyProjectpython3 -m venv env- env is the name of the virtual environment. You can name it anything.
- Activate the Virtual Environment:
Activate the virtual environment to use its isolated Python environment:
source env/bin/activate- Your terminal prompt will change to show the active environment (e.g., (env)).
- Install Python Packages:
Once the environment is active, install packages as needed. For example:pip install numpy pip install opencv-python - List Installed Packages:
Check installed packages in the virtual environment:pip list - Deactivate the Virtual Environment:
When done, deactivate the environment:
This will return you to the Python system environment.deactivate - Remove a Virtual Environment:
To delete the virtual environment, remove its directory:rm -rf env
Multiple Pythons on Raspberry Pi
To install multiple versions of Python on Ubuntu, you can use tools like apt, pyenv, or build Python versions manually. Here is how to set it up step-by-step:
Install Multiple Python Versions Using apt
Install Multiple Python Versions Using apt
This method is suitable for installing Python versions available in the Pi OS repositories.
- Update and Upgrade the System:
Start by updating the package lists and upgrading existing packages:sudo apt update sudo apt upgrade -y - Install Python Versions:
Check the available Python versions in the Linux repositories:
Install the desired Python versions, such as Python 3.8 and Python 3.10:apt-cache search python3sudo apt install python3.8 python3.10 -y - Verify Installed Python Versions:
You can have multiple Python versions installed simultaneously. To see the installed Python binaries, run:ls /usr/bin/python* /usr/bin/python /usr/bin/python3.8 /usr/bin/python3-config /usr/bin/python-dotenv /usr/bin/python3 /usr/bin/python3.11-config /usr/bin/python3-unidiff - Check Python Version Details:
To get precise version information, execute:python3 -V Python 3.11.2 - Manage Python Versions with update-alternatives:
To switch between Python versions, use the update-alternatives command. First, list all Python alternatives:
If no alternatives are configured, you may see an error message.sudo update-alternatives --list python /usr/bin/python3.8 /usr/bin/python3.10 - Configure Python Alternatives:
Update the alternatives table to include the installed Python versions:sudo update-alternatives --install /usr/bin/python3 python3 /usr/bin/python3.8 1 update-alternatives: using /usr/bin/python3.8 to provide /usr/bin/python (python) in auto mode sudo update-alternatives --install /usr/bin/python3 python3 /usr/bin/python3.10 2 update-alternatives: using /usr/bin/python3.10 to provide /usr/bin/python (python) in manual mode- The --install option takes multiple arguments:
- /usr/bin/python3: Path to the symbolic link.
- python3: Name of the alternative group.
- /usr/bin/python3.X: Path to the Python binary.
- Priority number: Determines the default selection if no manual choice is made. Higher numbers take precedence.
- In this example:
- /usr/bin/python3.10 is assigned priority 2.
- /usr/bin/python3.8 is assigned priority 1.
- The --install option takes multiple arguments:
- Verify Updated Alternatives:
List the Python alternatives again:sudo update-alternatives --list python3 /usr/bin/python3.8 /usr/bin/python3.10 - Switch Between Python Versions:
You can switch between the available Python versions using the --config option:
Follow the prompts to select the desired version by entering the corresponding selection number.sudo update-alternatives --config python3
Use pyenv for Version Management
Use pyenv for Version Management
pyenv is a popular tool to install and manage multiple Python versions.
- Install Dependencies:
sudo apt update sudo apt install -y build-essential curl libssl-dev zlib1g-dev libbz2-dev \ libreadline-dev libsqlite3-dev wget llvm libncurses5-dev libncursesw5-dev \ xz-utils tk-dev libffi-dev liblzma-dev python3-openssl git - Install pyenv:
Run the following commands to install pyenv:
Add the following lines to your shell configuration file (~/.bashrc or ~/.zshrc):curl https://pyenv.run | bash
Reload the shell:export PYENV_ROOT="$HOME/.pyenv" export PATH="$PYENV_ROOT/bin:$PATH" eval "$(pyenv init --path)" eval "$(pyenv init -)" eval "$(pyenv virtualenv-init -)"exec $SHELL - Install Python Versions:
Use pyenv to install the desired Python versions:pyenv install 3.8.12 pyenv install 3.10.7 - Set Global or Local Python Version:
Set a global version:
Set a local version for a specific project directory:pyenv global 3.10.7pyenv local 3.8.12 - Check the current version:
python --version
Build Python Versions from Source
Build Python Versions from Source
This method is more flexible but requires manual management.
- Install Build Dependencies:
sudo apt updatesudo apt update sudo apt install -y build-essential libssl-dev zlib1g-dev libncurses5-dev \ libncursesw5-dev libreadline-dev libsqlite3-dev libgdbm-dev libdb5.3-dev \ libbz2-dev libexpat1-dev liblzma-dev tk-dev libffi-dev git - Download Python Source Code:
Visit the Python downloads page and copy the link to the desired version.
Download the source code (e.g., Python 3.10.14 and 3.13.0):
Extract the tarball:wget https://www.python.org/ftp/python/3.10.14/Python-3.10.14.tgz wget https://www.python.org/ftp/python/3.13.0/Python-3.13.0.tgztar -xvf Python-3.10.14.tgz cd Python-3.10.14 - Build and Install Python:
Run the following commands:./configure --enable-optimizations sudo make altinstall- Use make altinstall instead of make install to avoid overwriting the default Python binary. Repeat the process for other Python versions.
- Switch Between Python Versions:
Specify the full path to the version you want to use:
Alternatively, create symbolic links:/usr/local/bin/python3.10 --version /usr/local/bin/python3.13 --versionsudo ln -sf /usr/local/bin/python3.10 /usr/bin/python3.10 sudo ln -sf /usr/local/bin/python3.13 /usr/bin/python3.13 - Verify Python Versions:
After installation, check the available versions:python3 --version python3.18 --version python3.13 --version
By following one of these methods, you can install and manage multiple versions of Python on the system efficiently!
Instructions for Using Virtual Environments
Virtual environments provide a way to isolate dependencies and manage Python packages efficiently. Below are two common approaches to setting up and using virtual environments.
Per-Project Environments
Per-Project Environments
This approach creates a dedicated virtual environment for each Python project, typically located in the project's root folder. This setup ensures that dependencies for one project do not affect others.
- Create a Virtual Environment
Navigate to the root folder of your project and run the following command to create a virtual environment folder (commonly named env):python -m venv env - Activate the Virtual Environment
Before working on your project, activate the environment by running:
Once activated, your terminal prompt will indicate the virtual environment is in use.source env/bin/activate - Deactivate the Virtual Environment
When you finish working, deactivate the virtual environment by running:deactivate
Per-User Environments
Per-User Environments
For users managing multiple projects with shared dependencies, a single virtual environment for your user account can be more convenient.
- Create a Global Virtual Environment
Place the virtual environment in your home directory, using a hidden folder to keep your workspace organized. Run:python -m venv ~/.env - Activate the Virtual Environment
Activate the virtual environment from any directory using:
Your terminal prompt will reflect the activation of the environment.source ~/.env/bin/activate - Deactivate the Virtual Environment
When you no longer need the environment, deactivate it by running:deactivate
Choose the setup that best fits your workflow: per-project for isolated environments or per-user for shared configurations.
Common Issues and Solutions
- Permission Denied Error:
If you encounter a permission issue, ensure the virtual environment directory is writable.chmod -R u+w env - pip Outdated:
Upgrade pip in the virtual environment:pip install --upgrade pip - Environment Not Activated:
Always activate the environment before running or installing packages:source env/bin/activate - Conflicts Between System and Virtual Environment:
If the wrong Python version is used, specify Python 3.x during environment creation:python3.9 -m venv env
With this guide, you can effectively manage Python projects on your Raspberry Pi, ensuring clean and isolated environments for development.
Install the Latest Python Version
- Download the latest version of Python from the official website.
- Go to the Python download page: https://www.python.org/downloads/
- Look for the second table on that page, "Looking for a specific release?":

- Click on the "Download" link corresponding to the newer version. In this case, we select to install Python 3.13.0
- Then, scroll to the bottom of the download page and find the list of download links:

- Right-click on “Gzipped source tarball” and choose “Copy link address” from the browser contextual menu.
- Open a terminal on Raspberry Pi OS
- Download the latest Python file with:
Replace the <URL> with the link you copied in the previous step:wget <URL>wget https://www.python.org/ftp/python/3.13.0/Python-3.13.0.tgz - Extract the file
Change the Python version if you downloaded another one.tar zxvf <filename>tar zxvf Python-3.13.0.tgz
- Download the latest Python file with:
- Configure and install Python latest version
- Move to the folder that contains the extracted files:
cd Python-3.13.0/ - Run the configuration command:
./configure --enable-optimizations - Once done, run this command to install it:
sudo make altinstall
- Move to the folder that contains the extracted files:
- Make Python 3 the default version on Raspberry Pi OS
- Update the symbolic link for Python
cd /usr/bin/
sudo unlink python3
sudo ln -s /usr/local/bin/python3.13 python3
- Update the symbolic link for Python
1.9 GPIO Control on Raspberry Pi 5
The Raspberry Pi 5 offers a powerful and modern platform for hardware control via its General Purpose Input/Output (GPIO) pins. These GPIOs allow you to interact with external components like LEDs, sensors, buttons, motors, and more — making the Pi a versatile tool for embedded systems and electronics prototyping.
While earlier Raspberry Pi models commonly used libraries like WiringPi and RPi.GPIO, newer Raspberry Pi devices, including the Pi 5, are transitioning toward more modern and kernel-integrated GPIO interfaces such as libgpiod, which utilizes the Linux GPIO character device (/dev/gpiochip*). This allows for safer, more scalable, and interrupt-driven GPIO handling.
WringPi
Web Link: https://github.com/WiringPi
WiringPi is a library for the Raspberry Pi that provides a GPIO interface for interacting with the hardware pins on the Pi board. It is designed to make it easier for developers to control the GPIO pins using a familiar and straightforward programming model.
Key Functions and Features of WiringPi
- GPIO Pin Control:
- Provides an easy-to-use interface to control GPIO (General Purpose Input/Output) pins.
- Enables setting pins as input or output, reading pin states, and writing signals to the pins.
- Support for Peripheral Devices:
- WiringPi includes support for common interfaces and peripherals, such as:
- SPI (Serial Peripheral Interface)
- I2C (Inter-Integrated Circuit)
- UART (Universal Asynchronous Receiver-Transmitter)
- Useful for connecting sensors, displays, motors, and other components.
- WiringPi includes support for common interfaces and peripherals, such as:
- Hardware Interaction:
- WiringPi allows direct access to the Raspberry Pi’s GPIO hardware.
- Works with /dev/gpiomem or /dev/gpiochip for user-level GPIO access.
- Ease of Programming:
- Provides bindings for multiple programming languages, including:
- C (primary interface)
- Python (through third-party libraries)
- Bash scripts (via CLI utilities)
- Simplifies prototyping and development for embedded systems and IoT projects.
- Provides bindings for multiple programming languages, including:
- Pin Abstraction:
Abstracts the physical GPIO pin layout into logical representations such as:- BCM mode (Broadcom chip numbering)
- WiringPi mode (custom numbering system)
- Physical mode (physical pin layout on the Pi header)
- Utility Commands:
- Comes with CLI utilities such as gpio for quick testing and debugging of GPIO pins.
- Examples include:
- Checking pin states: gpio readall
- Setting pin output: gpio write
The following steps outline the installation of WiringPi on a Raspberry Pi 5. This guide includes preparing your system, installing dependencies, and setting up WiringPi either by building from source or using prebuilt binaries.
Prerequisites
Before installing WiringPi, ensure your system is up-to-date:
sudo apt update && sudo apt upgrade -y
Ensure python3-apt is correctly installed:
sudo apt install python3-apt
Installing WiringPi
You can either build WiringPi from the source or use prebuilt binaries. Choose the method that suits your needs.
Option 1: Build WiringPi from Source
Option 1: Build WiringPi from Source
- Install git and clone the WiringPi repository:
sudo apt install git -y git clone https://github.com/WiringPi/WiringPi.git - Build a Debian package:
cd WiringPi ./build debian mv debian-template/wiringpi_3.10_arm64.deb . - Install the generated package:
sudo apt install ./wiringpi_3.10_arm64.deb
Option 2: Use Prebuilt Binaries
Option 2: Use Prebuilt Binaries
- Download the latest WiringPi release:
Visit the official WiringPi repository and download the latest prebuilt binary (e.g., wiringpi_3.10_arm64.deb). - Install the Debian package:
sudo apt install ./wiringpi_3.10_arm64.deb
Verification
After completing the installation of WiringPi, you can verify its proper setup by checking the version and system details.
- Run the following command to check the WiringPi version:
Expected Output: If the installation is successful, you should see output similar to this:gpio -vgpio -v gpio version: 3.10 Copyright (c) 2012-2024 Gordon Henderson and contributors This is free software with ABSOLUTELY NO WARRANTY. For details type: gpio -warranty Hardware details: Type: Pi 5, Revision: 00, Memory: 8192MB, Maker: Sony System details: * Device tree present. Model: Raspberry Pi 5 Model B Rev 1.0 * Does not support basic user-level GPIO access via memory. * Supports basic user-level GPIO access via /dev/gpiomem. * Supports basic user-level GPIO access via /dev/gpiochip (slow).- Note:
Pay attention to the [Hardware details: Type] field. If it shows "Unknown" instead of "Pi 5", you need to update WiringPi on your Raspberry Pi.
- Note:
- List GPIO Pinout:
Use the following command to display the GPIO pinout of your Raspberry Pi 5:gpio readall -h +-----+-----+---------+------+---+---Pi 5---+---+------+---------+-----+-----+ | BCM | wPi | Name | Mode | V | Physical | V | Mode | Name | wPi | BCM | +-----+-----+---------+------+---+----++----+---+------+---------+-----+-----+ | | | 3.3v | | | 1 || 2 | | | 5v | | | | 2 | 8 | SDA.1 | ALT3 | 1 | 3 || 4 | | | 5v | | | | 3 | 9 | SCL.1 | ALT3 | 1 | 5 || 6 | | | 0v | | | | 4 | 7 | GPIO. 7 | IN | 0 | 7 || 8 | 1 | ALT4 | TxD | 15 | 14 | | | | 0v | | | 9 || 10 | 1 | ALT4 | RxD | 16 | 15 | | 17 | 0 | GPIO. 0 | - | 0 | 11 || 12 | 0 | - | GPIO. 1 | 1 | 18 | | 27 | 2 | GPIO. 2 | - | 0 | 13 || 14 | | | 0v | | | | 22 | 3 | GPIO. 3 | - | 0 | 15 || 16 | 0 | - | GPIO. 4 | 4 | 23 | | | | 3.3v | | | 17 || 18 | 0 | - | GPIO. 5 | 5 | 24 | | 10 | 12 | MOSI | ALT0 | 0 | 19 || 20 | | | 0v | | | | 9 | 13 | MISO | ALT0 | 0 | 21 || 22 | 0 | - | GPIO. 6 | 6 | 25 | | 11 | 14 | SCLK | ALT0 | 0 | 23 || 24 | 1 | OUT | CE0 | 10 | 8 | | | | 0v | | | 25 || 26 | 1 | OUT | CE1 | 11 | 7 | | 0 | 30 | SDA.0 | IN | 1 | 27 || 28 | 1 | IN | SCL.0 | 31 | 1 | | 5 | 21 | GPIO.21 | - | 0 | 29 || 30 | | | 0v | | | | 6 | 22 | GPIO.22 | IN | 0 | 31 || 32 | 0 | - | GPIO.26 | 26 | 12 | | 13 | 23 | GPIO.23 | - | 0 | 33 || 34 | | | 0v | | | | 19 | 24 | GPIO.24 | - | 0 | 35 || 36 | 0 | IN | GPIO.27 | 27 | 16 | | 26 | 25 | GPIO.25 | - | 0 | 37 || 38 | 0 | - | GPIO.28 | 28 | 20 | | | | 0v | | | 39 || 40 | 0 | - | GPIO.29 | 29 | 21 | +-----+-----+---------+------+---+----++----+---+------+---------+-----+-----+ | BCM | wPi | Name | Mode | V | Physical | V | Mode | Name | wPi | BCM | +-----+-----+---------+------+---+---Pi 5---+---+------+---------+-----+-----+
With the above steps, you can confirm that WiringPi is properly installed and ready for use.
libgpio
libgpiod (LibGPIO for Devices) is the official Linux kernel interface for GPIO access via the character device model (/dev/gpiochip*). Unlike older libraries like RPi.GPIO or WiringPi, libgpiod is future-proof, supports event-driven GPIO handling, and works natively with modern kernels, making it ideal for the Raspberry Pi 5.
It offers both:
- A Python API (via python3-libgpiod)
- A C language interface (libgpiod-dev)
This allows flexible GPIO control in both rapid prototyping and low-level systems programming.
Installation
- For Python
sudo apt update sudo apt install python3-libgpiod - For C/C++
sudo apt update
sudo apt install libgpiod-dev
Verification
- To check the GPIO device
gpiodetect
gpioinfo
Code Demonstration
- Python Example (LED Blink using GPIO 18)
import gpiod import time chip = gpiod.Chip("gpiochip0") # Open the first GPIO chip line = chip.get_line(18) # Use GPIO pin 18 (BCM) # Request the line for output line.request(consumer="blink", type=gpiod.LINE_REQ_DIR_OUT) # Toggle the GPIO print("Blinking LED on GPIO 18") for i in range(5): line.set_value(1) time.sleep(0.5) line.set_value(0) time.sleep(0.5) line.release() - C Example (LED Blink using GPIO 18)
#include <gpiod.h>
#include <unistd.h>
#include <stdio.h>

int main() {
    const char *chipname = "gpiochip0";
    struct gpiod_chip *chip;
    struct gpiod_line *line;
    int i;

    chip = gpiod_chip_open_by_name(chipname);
    if (!chip) {
        perror("Open chip failed");
        return 1;
    }

    line = gpiod_chip_get_line(chip, 18);
    if (!line) {
        perror("Get line failed");
        gpiod_chip_close(chip);
        return 1;
    }

    if (gpiod_line_request_output(line, "blink", 0) < 0) {
        perror("Request line as output failed");
        gpiod_chip_close(chip);
        return 1;
    }

    printf("Blinking LED on GPIO 18\n");
    for (i = 0; i < 5; i++) {
        gpiod_line_set_value(line, 1);
        usleep(500000);
        gpiod_line_set_value(line, 0);
        usleep(500000);
    }

    gpiod_chip_close(chip);
    return 0;
}
1.10 Raspberry Pi Backup/Restore Tool
Raspberry Pi Backup/Restore Tool
Description
This script allows you to back up the entire SD card of your Raspberry Pi to an SSD mounted at /ssd. It also supports restoring the backup image to the SD card.
Features
- One-click backup of the entire SD card to
/ssdwith auto-date naming - Compressed backup file (
.img.gz) to save space - Progress display using
dd status=progress - Restore feature with backup file listing
- SSD space check to avoid failures
- Safety confirmation before restoring
Script Code: pi-backup.sh
#!/bin/bash
# Raspberry Pi Backup/Restore Tool
# Features:
# - Auto-detect SD card device
# - Auto-remove old backups (keep last 3)
# - Backup SD card to SSD with gzip compression
# - Restore backup from SSD to SD card

# === Configuration ===
BACKUP_DIR="/ssd"    # SSD mount point
DATE=$(date +%Y-%m-%d)
BACKUP_FILE="$BACKUP_DIR/pi-backup-$DATE.img.gz"

# === Functions ===
detect_sd_device() {
  # Auto-detect SD card device (usually mmcblk0)
  DEVICE=$(lsblk -d -o NAME,TYPE | grep 'disk' | grep -E 'mmcblk0|mmcblk1' | awk '{print "/dev/" $1}')
  if [ -z "$DEVICE" ]; then
    echo "Error: Could not detect SD card device. Please check your system."
    exit 1
  fi
  echo "[Detected SD card device]: $DEVICE"
  SD_DEVICE="$DEVICE"
}

remove_old_backups() {
  echo "[Info] Checking old backups in $BACKUP_DIR..."
  BACKUP_COUNT=$(ls -1t $BACKUP_DIR/pi-backup-*.img.gz 2>/dev/null | wc -l)
  if [ "$BACKUP_COUNT" -gt 3 ]; then
    echo "[Cleanup] More than 3 backups found. Removing older ones..."
    ls -1t $BACKUP_DIR/pi-backup-*.img.gz | tail -n +4 | while read OLD_FILE; do
      echo "  Deleting: $OLD_FILE"
      rm -f "$OLD_FILE"
    done
  fi
}

check_space() {
  echo "[Check] SSD mount point: $BACKUP_DIR"
  if [ ! -d "$BACKUP_DIR" ]; then
    echo "Error: $BACKUP_DIR does not exist. Make sure SSD is mounted."
    exit 1
  fi

  echo "[Check] SSD free space..."
  FREE_SPACE=$(df --output=avail -m "$BACKUP_DIR" | tail -1)
  SD_SIZE=$(blockdev --getsize64 $SD_DEVICE)
  SD_SIZE_MB=$((SD_SIZE / 1024 / 1024))
  echo "  SSD available space: ${FREE_SPACE}MB"
  echo "  SD card size: ${SD_SIZE_MB}MB"

  if [ "$FREE_SPACE" -lt "$SD_SIZE_MB" ]; then
    echo "Error: SSD space is not enough. Need at least ${SD_SIZE_MB}MB"
    exit 1
  fi
}

# === Main ===
if [ "$EUID" -ne 0 ]; then
  echo "Please run this script with sudo"
  exit 1
fi

echo "=========================="
echo " Raspberry Pi Backup/Restore Tool"
echo "=========================="
echo "1) Backup SD card -> SSD"
echo "2) Restore SSD -> SD card"
echo "0) Exit"
read -p "Choose an option [0-2]: " CHOICE

case $CHOICE in
  1)
    detect_sd_device
    check_space
    echo "[Start backup] SD -> $BACKUP_FILE"
    dd if=$SD_DEVICE bs=4M status=progress | gzip > "$BACKUP_FILE"
    sync
    echo "[Done] Backup file: $BACKUP_FILE"
    remove_old_backups
    ;;

  2)
    detect_sd_device
    echo "[Check] SSD mount point: $BACKUP_DIR"
    if [ ! -d "$BACKUP_DIR" ]; then
      echo "Error: $BACKUP_DIR does not exist"
      exit 1
    fi

    echo "Available backup files:"
    ls $BACKUP_DIR/pi-backup-*.img.gz 2>/dev/null || { echo "No backup files found"; exit 1; }

    read -p "Enter the full path of the file to restore: " RESTORE_FILE
    if [ ! -f "$RESTORE_FILE" ]; then
      echo "Error: File not found"
      exit 1
    fi

    echo "[WARNING] This will overwrite $SD_DEVICE. Continue? (yes/no)"
    read CONFIRM
    if [ "$CONFIRM" != "yes" ]; then
      echo "Operation canceled"
      exit 0
    fi

    echo "[Start restore] $RESTORE_FILE -> $SD_DEVICE"
    gzip -dc "$RESTORE_FILE" | dd of=$SD_DEVICE bs=4M status=progress
    sync
    echo "[Done] SD card restored"
    ;;

  0)
    echo "Exit"
    exit 0
    ;;
  *)
    echo "Invalid option"
    exit 1
    ;;
esac
Usage
- Save the script as
pi-backup.sh - Make it executable:
chmod +x pi-backup.sh - Run with:
sudo ./pi-backup.sh
Next Improvements
- Auto-detect SD card device
- Option to select compression level (gzip or xz)
- Auto-remove old backups (keep last 3)
- System notifications or Telegram alerts