Integrating VS Code, Conda, and Multi-Language Toolchains
This guide explains how to install and configure the standard development environment used in this course. The environment is based on:
- Miniconda
- Visual Studio Code
- Jupyter Notebook
- Python 3.12
- C/C++ external compiler
- Verilog simulator (Icarus Verilog)
To ensure all students use the same software environment, we provide an environment.yml file. Using this file lets Conda automatically install all required packages with a single command.
1. Introduction: A Modern Engineering Workflow
Introduction: A Modern Engineering Workflow
To succeed in digital systems and software engineering, you need a workspace that is both powerful and organized. Our course utilizes a "Triple-Threat" toolchain: Visual Studio Code, Conda, and Jupyter Notebooks.
What is Visual Studio Code (VS Code)?
What is Visual Studio Code (VS Code)?
Visual Studio Code is a lightweight but extremely powerful source-code editor. It is the industry standard for modern developers.
- Why use it? Unlike heavy IDEs, VS Code is fast and highly customizable. With its vast library of Extensions, it can be transformed from a simple text editor into a full-featured development suite for Python, C/C++, and Verilog simultaneously.
What is Jupyter Notebook?
What is Jupyter Notebook?
Jupyter Notebook is an open-source web application that lets you create and share documents with live code, equations, visualizations, and narrative text.
- Why use it? It is the ultimate learning tool. By using Markdown, we can embed instructional guides, images, and math formulas directly next to the code you are writing. You don't just "run" code; you document your thought process alongside it.
What is Conda?
What is Conda?
Conda is an open-source package and environment management system. Think of it as a "container" for your projects.
- Why use it? Software projects often require different versions of Python or specific compilers. Conda allows you to create Isolated Environments. This ensures that the tools you install for this class won't conflict with other software on your computer. If something breaks, you can simply delete the environment and start over without reformatting your PC.
How VSC + Conda + Python Help You Learn C/C++ and Verilog
How VSC + Conda + Python Help You Learn C/C++ and Verilog
While Jupyter was originally built for Python, we use the Python engine as a "coordinator" to help you learn hardware and low-level software:
- Integrated Learning: You can read the theory in a Markdown cell and immediately implement the code in the next cell.
- Automated Toolchains: We use Python "Magic Commands" to automate tedious engineering tasks. Instead of manually typing complex commands into a terminal, a single click handles Saving → Compiling → Executing → Displaying Output.
- Visualization: Python can take the raw data produced by your C++ program or the waveform from your Verilog simulation and turn it into professional graphs and charts instantly.
2. Step-by-Step Installation & Environment Setup
- Install the Core Software
Before running any commands, ensure you have the following installed on your Windows 11 machine:- Miniconda: Download for Windows. (Choose the latest Miniconda installer Windows-x86_64 version).
- Go to the Miniconda Download Page.
- Select the Miniconda3 Windows 64-bit installer. (Do not download "Anaconda Distribution".)
- Recommended installation options:
- Install Location: C:\BAT\Python\miniconda3
- ✔ Just Me
- ✔ Register Miniconda as the default Python
- ✘ Do NOT add Miniconda to PATH (conda init will handle this)
- Visual Studio Code (VSC): Download for Windows. (Download the System Installer x64)
- Miniconda: Download for Windows. (Choose the latest Miniconda installer Windows-x86_64 version).
Understanding the Conda Prompts
When you install Miniconda, you will see two different command-line tools. While they both allow you to manage environments, they behave differently:
| Feature | Anaconda Prompt | Anaconda PowerShell Prompt |
| Engine | Standard Windows Command Prompt (cmd.exe) | Windows PowerShell (pwsh.exe) |
| Syntax | Traditional DOS (e.g., dir, copy) | Modern Scripting (e.g., ls, cp) |
| Speed | Very fast to launch | Slightly slower launch |
| Use Case | Best for simple conda commands. | Best for complex automation or scripting. |
Which one does VS Code use?
By default, VS Code uses PowerShell. However, once you run conda init, VS Code becomes smart enough to use the Conda environment regardless of which shell is active. For this course, we recommend using the standard Anaconda Prompt for setup as it is more straightforward.
Advanced Setup: Custom Environment Location
By default, Conda stores environments inside your User folder. To keep your system organized, we will redirect Conda to store all environment files in a specific folder (e.g., C:\BAT\Python\Miniconda_Envs).
Step 1: Set "Run as Administrator"
Because you are creating folders on the C: drive, you need elevated permissions to run the prompts.
- Click the Start Menu and search for Anaconda Prompt.
- Right-click it and select Open file location.
- In the folder that opens, right-click the shortcut, select Properties, and go to the Shortcut tab.
- Click Advanced... and check the box: [x] Run as administrator.
- Repeat this for the Anaconda PowerShell Prompt.
Step 2: Configure the Custom Environment Folder (Optional but Recommended)
Open your Anaconda Prompt (Admin) and run the following commands to redirect your installations:
# Create the physical folder first
mkdir C:\BAT\Python\Miniconda_Envs

# Add the folder to Conda's configuration
conda config --add envs_dirs C:\BAT\Python\Miniconda_Envs
Verify the Configuration:
To ensure Conda is now pointing to your custom directory, run:
conda config --show envs_dirs
Expected Output:
You should see C:\BAT\Python\Miniconda_Envs at the top of the list. Now, any conda create command you run will automatically install the environment into that specific folder.
Step 3: Configure Package Cache (Recommended)
To prevent the miniconda3 directory from becoming very large, it is recommended to store package caches separately.
# Create the cache directory
mkdir C:\BAT\Python\Miniconda_pkgs

# Configure Conda to use this directory
conda config --add pkgs_dirs C:\BAT\Python\Miniconda_pkgs
Verify the configuration:
conda config --show pkgs_dirs
Expected result:
pkgs_dirs: - C:\BAT\Python\Miniconda_pkgs - C:\BAT\Python\miniconda3\pkgs
This configuration keeps the base installation clean and stores downloaded packages separately.
- Create the Teaching Environment Using environment.yml:
Download the provided file: environment.yml
Place it in your working directory (for example):
C:\AirSupplyLab
Open Anaconda Prompt and navigate to that folder:
cd C:\AirSupplyLabCreate the environment using:
conda env create -f environment.ymlThis command will automatically install all required packages, including:
- Python 3.12
- Jupyter Notebook
- JupyterLab
- NumPy
- Pandas
- Matplotlib
- Icarus Verilog
- Development utilities
- Activate the Environment:
conda activate py312_vsc_baseVerify the Python version:
python --versionExpected output:
Python 3.12.x
- Install Required VS Code Extensions:
Open the Extensions panel in VS Code. Install the following extensions:
- Python (ms-python.python)
- Jupyter (ms-toolsai.jupyter)
- Pylance (ms-python.vscode-pylance)
- Black Formatter
- C/C++ (ms-vscode.cpptools)
- Verilog HDL (mshr-h.veriloghdl)
- Error Lens
These extensions provide Python support, notebook integration, C/C++ syntax highlighting, Verilog editing tools, and improved diagnostics.
- Select the Python Kernel:
Open a Jupyter Notebook (.ipynb file) in VS Code. Select the kernel at the top-right corner:
py312_vsc_base (Python 3.12)
- Verify the Installation Using Jupyter Notebook:
Create a notebook named:
verify_installation.ipynb
Verify Python:
import sys
print("Python version:", sys.version)
Verify Scientific Libraries:
import numpy
import pandas
import matplotlib

print("Scientific libraries loaded successfully.")
Verify Jupyter:
import IPython
print("IPython version:", IPython.__version__)
Verify Verilog Simulator:
!iverilog -VIf the version information is displayed, the Verilog simulator is installed correctly.
Environment Setup Complete:
If all cells run successfully, your development environment is ready.
You can now begin programming assignments using:
- Python
- C / C++
- Verilog HDL
- Jupyter Notebook
All labs and homework in this course will use this standardized environment.
3. Conda Commands
Python Environment Management: A Professional Guide
By utilizing the following commands, you can efficiently create, manage, and toggle between isolated Python environments on Windows 11 without compromising your core system configuration. This approach ensures a stable and professional development workflow.
1. Core Environment Management
Always execute these commands via the Miniconda Prompt (available in your Start Menu) to ensure the correct pathing and permissions.
| Action | Command Example | Description |
|---|---|---|
| Create Environment | conda create -n py312_vsc_base python=3.12 |
Creates an isolated environment named py312_vsc_base with Python 3.12. |
| List Environments | conda env list |
Displays all existing environments and their installation directories. |
| Activate Environment | conda activate py312_vsc_base |
Switches your current session to the specified environment. |
| Deactivate Environment | conda deactivate |
Exits the current environment and returns to the base system environment. |
| Remove Environment | conda remove -n py312_vsc_base --all |
Permanently deletes the environment and all its associated packages. |
2. Package Installation & Maintenance
Once an environment is activated, use the following methods to manage your libraries:
- Conda (Recommended Strategy):
conda install numpy pandas
Advantage: Conda automatically resolves complex dependencies to prevent version conflicts. - Pip (Alternative):
pip install requests
Advantage: Use Pip for niche libraries not found in the Conda channels.
3. The "Golden Configuration" for VS Code
VS Code serves as the primary gateway for your toolchain. Follow these steps to ensure seamless integration:
- Extension Requirement: Install the official Python Extension by Microsoft from the VS Code Marketplace.
- Automatic Detection: After creating a new environment in Miniconda, restart VS Code; it should automatically detect the new path.
- Manual Interpretation Selection:
- Press Ctrl + Shift + P.
- Search for "Python: Select Interpreter".
- Choose your specific environment (e.g.,
'py312_vsc_base': conda).
Result: The selected environment will be displayed in the VS Code status bar (bottom-right). The integrated terminal will automatically trigger conda activate upon launch.
Case Study: Setting up an Engineering Project
If a specific hardware project requires a legacy Python version (e.g., 3.9):
- Launch Miniconda Prompt.
- Execute
conda create -n digital_logic python=3.9. - Execute
conda activate digital_logic. - Install necessary tools:
conda install iverilog m2w64-gcc -c conda-forge. - Open the project in VS Code and select digital_logic as your active interpreter.
embedded_systems or computer_org). This is much more intuitive than using generic version numbers.Bonus: Create a "One-Click" Course Desktop Shortcut
To save time, you can create a desktop shortcut that automatically launches VS Code with your py312_vsc_base environment pre-activated. This prevents you from having to manually toggle environments every time you start a lab.
Setup Instructions:
- Create a New Shortcut: Right-click on your Desktop → New → Shortcut.
- Enter the Target Path: Copy and paste the following command into the location box (adjust the username if necessary):
%windir%\System32\cmd.exe /K "conda activate py312_vsc_base && code ." - Name the Shortcut: Name it "VS Code - EE Course" or "EE Lab Workstation".
- Change the Icon (Optional): Right-click the new shortcut → Properties → Change Icon.... Browse to the location where VS Code is installed (usually
%LocalAppData%\Programs\Microsoft VS Code\Code.exe) to use the official VS Code icon.
4. One-Step Installation: AirSupplyLab Classroom Kit
1. Overview
The AirSupplyLab Classroom Kit provides a one-step installation batch file that helps students set up the required programming environment for class. The installer checks the computer system, installs or configures Miniconda, creates a Python environment, registers a Jupyter kernel, installs required Python packages, installs supporting tools such as GTKWave and BCC102, and installs useful Visual Studio Code extensions.
This guide explains how to use the file AirSupplyLabClassroomKit_Student.zip and run the installer correctly.
2. What This Installer Sets Up
The installer prepares the following tools and components:
- Miniconda for Python environment management
- Python 3.12 Conda environment named py312_vsc_base
- Jupyter Notebook / JupyterLab support
- Common Python packages such as numpy, pandas, matplotlib, pytest, black, and others
- Jupyter kernel named py312_vsc_base (Python 3.12)
- GTKWave for waveform viewing
- BCC102 C/C++ compiler
- Visual Studio Code extensions for Python, Jupyter, C/C++, Verilog, Markdown, formatting, and error display
- A default workspace folder such as C:\AirSupplyLab
Important note: this installer requires Visual Studio Code to already be installed. If VS Code is missing, the installer will open the VS Code download page and ask you to install it first. After installing VS Code, run the AirSupplyLab installer again.
3. Before You Begin
Before running the installer, make sure you are using a Windows computer and have an internet connection. The installer may need to download Miniconda, GTKWave, BCC102, and VS Code extensions if they are not already included in the ZIP package.
It is recommended that you close Visual Studio Code and other programming tools before starting the installation.
4. Download and Extract the ZIP File
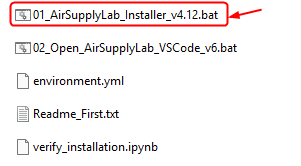
First, download AirSupplyLabClassroomKit_Student.zip from the location provided by your instructor. After downloading the file, do not run the installer directly from inside the ZIP file.
Right-click the ZIP file and select Extract All. Extract the files to a normal folder, such as: C:\AirSupplyLabClassroomKit_Student
After extraction, open the extracted folder and find the batch file: 01_AirSupplyLab_Installer_vx.xx.bat
5. Run the Installer
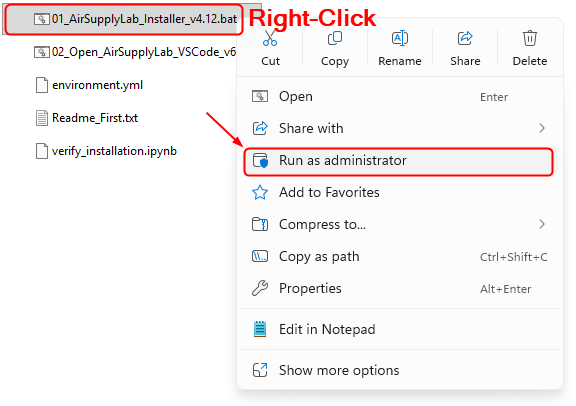
Right-click the file 01_AirSupplyLab_Installer_v4.12.bat and select Run as administrator. Running as an administrator is recommended because the installer creates folders under C:\BAT and may need write permissions to system-level folders.
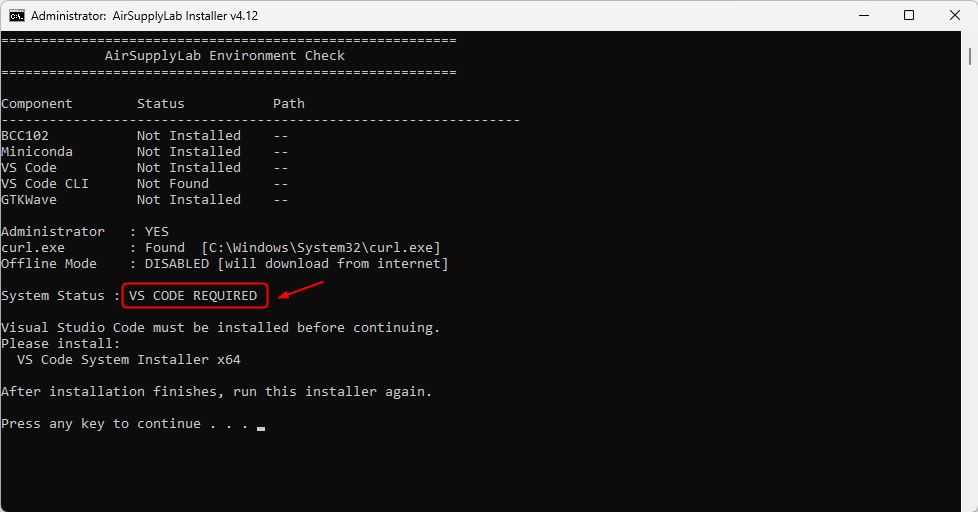
When the installer starts, it will show an AirSupplyLab Environment Check screen. This screen checks whether the following components are already installed:
- Miniconda
- Visual Studio Code
- VS Code command-line tool
- GTKWave
- BCC102 compiler
- Internet download support
If the system status shows READY TO INSTALL, press any key to continue.

If the system status shows VS CODE REQUIRED, install Visual Studio Code first, then run the installer again.
6. Miniconda Installation Option
If Miniconda is not already installed, the installer will ask you to choose one of the following installation modes:
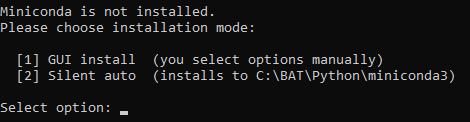
For most students, option [2] — Silent auto is recommended. This automatically installs Miniconda to: C:\BAT\Python\miniconda3
If you choose the GUI installation option, use the recommended installation path: C:\BAT\Python\miniconda3
During GUI installation, select the following options:
- Register Miniconda as default Python: Yes
- Add Miniconda to PATH: No
After Miniconda finishes installing, return to the installer window and press any key to continue.
7. Python Environment Setup
The installer uses the included environment.yml file to create and configure the required Conda environment. This file contains the Python version and the required Python packages for the class. The installer will create a Conda environment named:: py312_vsc_base
This environment is used for Python programming, Jupyter Notebook, and class assignments. After the environment is created, the installer installs and registers the Jupyter kernel: py312_vsc_base (Python 3.12)
The installer also configures Conda to store environments and packages in the following folders:
- C:\BAT\Python\Miniconda_Envs
- C:\BAT\Python\Miniconda_Pkgs
8. Jupyter Kernel Setup
After the Python environment is created, the installer registers a Jupyter kernel named: py312_vsc_base (Python 3.12)
This kernel connects Jupyter Notebook files to the correct Python environment and installed packages. When students open verify_installation.ipynb or other class notebook files in Visual Studio Code, they should select this kernel.
If this kernel is not selected, the notebook may not be able to find the required Python packages.
9. Additional Tools
The installer also checks for and installs the following tools if they are missing:
GTKWave
GTKWave is used to view waveform files, especially for digital logic and Verilog-related work.
BCC102
BCC102 provides a C/C++ compiler and related tools.
If these tools are already installed, the installer will skip them.
10. Visual Studio Code Extensions
The installer installs the following Visual Studio Code extensions:
- Python language support
- Jupyter Notebook support
- Pylance
- Black formatter
- Jupyter renderers
- C/C++ support
- Verilog HDL support
- Error Lens
- Better Comments
- Markdown All in One
If an extension is already installed, the installer will skip it.
11. Workspace Folder
Near the end of the installation, the installer will look for an existing workspace folder in this order:
- C:\AirSupplyLab
- C:\CSULA
- C:\SCIT
- C:\NORCO
- R:\Projects
If none of these folders exist, the installer will create: C:\AirSupplyLab
This folder will serve as the default workspace for class projects.
12. Launch Visual Studio Code
At the end of the installation, the installer will ask whether you want to launch Visual Studio Code.
Choose: [1] Launch VS Code now
The installer will open the selected workspace folder. If the file verify_installation.ipynb is included in the installer folder, it will also open that notebook automatically.
13. Verify the Installation
In Visual Studio Code, open the file: verify_installation.ipynb
Select the kernel: py312_vsc_base (Python 3.12)
Then click Run All.
If all notebook cells run successfully, the installation is complete.
14. Installation Log File
The installer creates a log file in the same folder as the batch file: AirSupplyLab_Installer_v4_12.log
If the installation fails, send this log file to your instructor for troubleshooting.
15. Troubleshooting
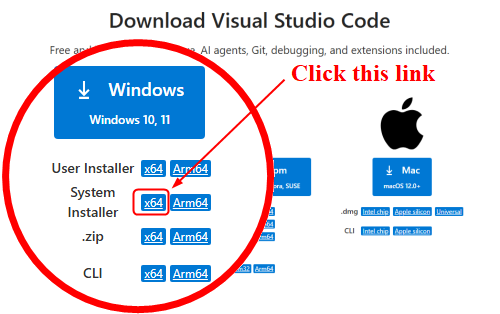
- If Visual Studio Code is not installed, install the Visual Studio Code System Installer x64 first, then run the AirSupplyLab installer again.
- If the Miniconda installation fails, run the batch file again as an administrator and select the silent auto-install option.
- If VS Code extensions fail to install, check your internet connection and run the installer again.
- If the Python environment fails to create, check the log file and make sure your internet connection is working.
- If Jupyter Notebook does not show the correct kernel, restart Visual Studio Code and select: py312_vsc_base (Python 3.12)
16. Final Checklist
After installation, confirm the following:
- Visual Studio Code opens correctly
- The workspace folder opens correctly
- The Python kernel py312_vsc_base (Python 3.12) is available
- verify_installation.ipynb runs successfully
- The installation summary does not show major failures
After completing these steps, your computer is ready for class programming assignments.