Lesson 14: Memories in Verilog
Memories are digital storage elements that can store data and information in digital circuits. In Verilog, you can use reg variables to implement memory.
RAM Memories
RAM
RAM storage represented by an array variable
module ram_4096x16(clk, en, wr, addr, din, dout);
input           clk, en, wr;
input   [11:0]  addr;
input   [15:0]  din;
output  [15:0]  dout;

tri [15:0] dout;
reg [15:0] data;

assume dout = (en == 1'b0)? data: 16'hzzzz;
reg [15:0] mem [0:4095];

always @(posedge clk) begin
    if (en == 1'b1) begin
        if (wr == 1'b1) begin
            mem[addr] <= din;
            data      <= din;
        end else begin
            data     <= mem[addr];
        end
    end else begin
        data <= 16'hzzzz;
    end
end

endmodule
ROM
Generally, ROM is used to store constant data or CPU instruction codes. ROM can also be used to implement any truth table, as a lookup table for mathematical functions, and as a decoder. In the FPGA, the ROMs can be built
ROM using for combinational logic circuit
ROM using for combinational logic circuit
A simple ROM is a combinational circuit that maps from an input address to a constant data value. We could specify the ROM contents in tabular form, with a row for each address and an entry showing the data value for that address.
The truth tables are defined by "input variables" and "output variables", and we have been thinking of them as evaluating logical expressions. Another way to think of a combinational circuit is to think of them as a ROM. The input variables encode a memory address; the output variables encode the value stored at the address.
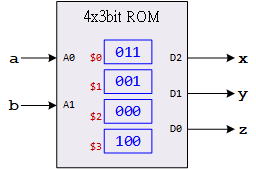
For example. we have a digital circuit block as shown below. There is no detailed circuit schematic, but there is a truth table.

The truth table can be regarded as a ROM memory; the two input variables a and b are specified as the memory address, and the contains at each address are specified by the output variables x, y, and z. The following table is the corresponding memory for the circuit.
| input (Address) | output (Contents of Memory) |
|---|---|
| 00 | 011 |
| 01 | 001 |
| 10 | 000 |
| 11 | 100 |
What is new about this concept? You now have to think of the input and output variables in a different way than you did before. Before, you thought of the input variables as having TRUE or FALSE values, and you did not associate any particular significance to their order. Thinking about the circuit as a ROM is quite different. You no longer think of each of the input variables as TRUE or FALSE. Rather, you think of the input variables as defining a binary number, namely an address. The order of the input variables now has significance, since it defines an ordering on the address space. Similarly, the output variables are a string of bits whose order may or may not matter.
The Verilog model of the circuit is shown below:
module exCircuit(a, b, x, y, z);
input a, b;
output x, y, z;

reg x, y, z;

always @(*) begin
    case ({a, b})
        2'b00:      {x,y,z} = 3'b011;
        2'b00:      {x,y,z} = 3'b001;
        2'b00:      {x,y,z} = 3'b000;
        default:    {x,y,z} = 3'b100;
    endcase
end
endmodule
In this example, we use a case statement in a combinational always block to implement a truth-table form of the mapping. However, we form the address from the concatenation of the a and b inputs. The case statement then specifies the output for all possible combinations of values for the address. The FPGA synthesis tool could then infer a ROM to implement the mapping.
FPGA SSRAM Blocks as ROM
FPGA SSRAM Blocks as ROM
In FPGA fabrics that provide SSRAM blocks, we can use an SSRAM block as a ROM.
However, ROM circuit structures are generally much denser than arbitrary gate-based circuits, since each ROM cell needs at most one transistor. Indeed, for a complex combinational function with multiple outputs, it may be better to use a ROM to implement the function than a gate-based circuit. For example, a ROM might be a good candidate for the next-state logic or the output logic of a complex finite-state machine.