Tiva Lab 02: Home Control System
Introduction
This lab aims to acquaint learners with the Home Control System using Tiva TM4C LaunchPads. Participants will explore how to effectively utilize the General Purpose Input/Output (GPIO) configurations and understand how to read and write data through pins, thus controlling various household devices.
Objective
- Grasp the basics of I/O operations in Tiva TM4C LaunchPads.
- Master GPIO configurations.
- Read data from the input pin and write data to the output pin.
Required Reading Material
- Set, Clear, Toggle and Check Bit Value in C
- Input Signal Edge Detection using Software
- Lesson 09: GPIO Ports and Configurations
- Buzzer
Background Information
GPIO (General Purpose Input/Output)
It's an interface standard that allows microcontrollers to connect with other electrical devices. These GPIOs can be set in two primary modes:
- Input Mode
The microcontroller gathers input from other devices, like receiving the status of a button. - Output Mode
The microcontroller sends data to devices, such as instructing an LED to turn on/off.
This lab will guide participants through writing C code to set up GPIO ports, decipher the status of switches, and manage LED operations.
The GPIO configuration is vital. Post reset, the software must be initialized, including loading the right configurations described in "Lesson 09: GPIO Ports and Configurations".
You can read the following articles to get more information about LEDs and push-buttons:
- LED: Digital Logic Lab- Lab 01: Introduction to Electrical Circuits: Exp# 1.2
- Push-button: Digital Logic Lab- Lab 01: Introduction to Electrical Circuits: Exp# 1.3
Requirements
Now, a client has asked you to remodel their house. He wants to use an embedded system to control all the lighting systems in the house, including the doorbell. Three types of control systems can be used in a home control:
- A button controls a device: like a doorbell — when the user presses the doorbell button, the system triggers the doorbell to make noises until the button is released.
- A switch controls a group of lights: the lights come on when the user presses the switch. Press again to turn off the lights.
- Multiple switches control a group of lights: e.g., stairwell lighting control system — switches are installed on the first and second floors near the stairs. When the user presses any switch, the light turns on, and presses any switch again to turn off the light.
Required Components List
| Push Button (Switch) | × 4 | |
 |
220-ohm Resistor | × 3 |
| LED | × 2 | |
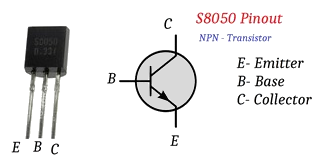
| S8050 NPN Transistor | × 1 | |
| Active Buzzer | × 1 | |
| Breadboard | × 1 |
Circuit / Schematic Diagram
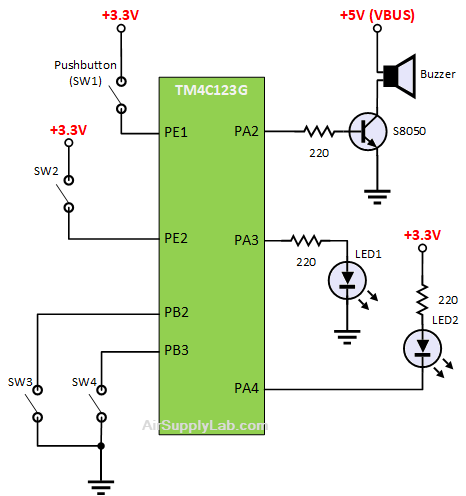
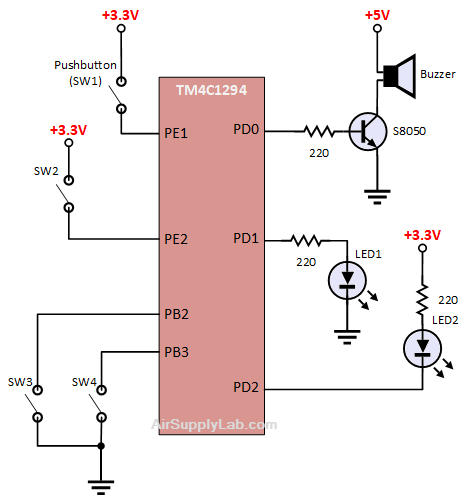
The prototype system will use a Tiva board to emulate the three control systems. Details of the circuit can be referred to in Figures 1 (Simulation Circuit for Home Using TM4C123GXL/TM4C1294) and Figure 1.2 (Circuit Connection on the Breadboard). Also, the pin configurations for different devices are given in Table 1.
EK-TM4C123GXL LaunchPad
 |
 |
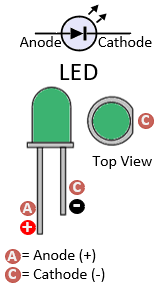 |
Figure 1: The Simulation Circuit for Home Using TM4C123GXL
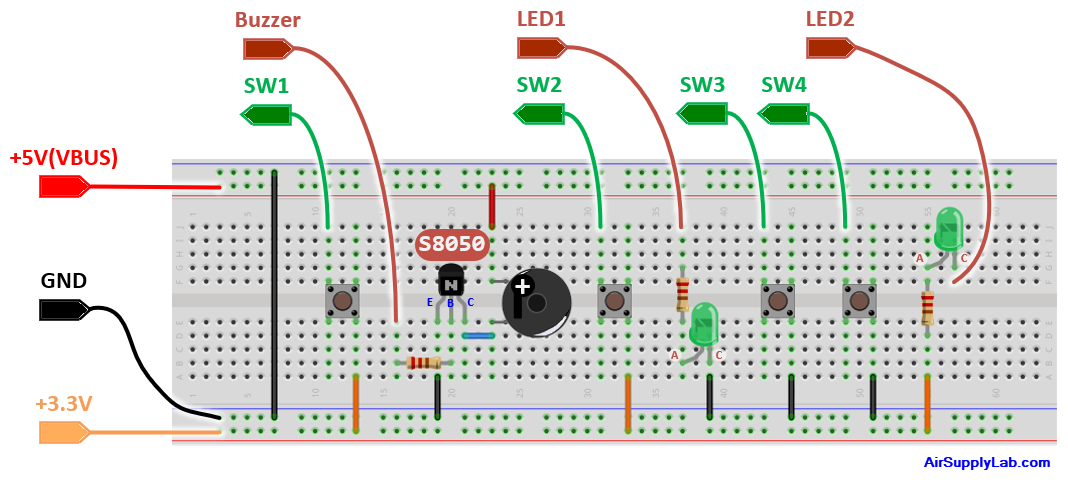
Figure 1.2: The Circuit Connection on the Breadboard
Table 1: Pin Configurations:
| Device | Port.Pin | Signal Type | PCTL | Direction | Drive Mode |
|---|---|---|---|---|---|
EK-TM4C1294XL LaunchPad
 |
|
|
Figure 1: The Simulation Circuit for Home Using TM4C1294XL
Figure 1.2: The Circuit Connection on the Breadboard
Table 1: Pin Configurations:
| Device | Port.Pin | Signal Type | PCTL | Direction | Drive Mode |
|---|---|---|---|---|---|
You have to place all the components on the breadboard and use wires to connect the components to the Tiva board. The main functions you have to implement are as follows.
- The SW1 is used to control the buzzer (doorbell).
- The SW2 is used to control LED1.
- The SW3 and SW4 are used to control LED2, which is installed on the stair.
Procedures
- Make a new folder named "Lab02_HomeControlSystem" inside the "EE3450" folder.
- Launch the Keil μVisio and start a new project. Save the project to the recently created folder with the name "Lab02_HomeControllSystem".
- Add "MyDefines.h" to the Source Group, then add the Common folder to the "include paths" under the "Options for Target" setting.
Configurations
Implement the Setup_GPIO() function to initialize the GPIO Ports based on the PIN Configuration table.
GPIO Initialization and Configuration
GPIO Initialization Configuration
Next, we need to configure all the GPIO ports and pins that are used in the design.
According to the pin connections, complete the following GPIO configurations for each port. Fills the pin field by the value below:
- 0: Clean the bit
- 1: Set the bit
- x: Do not change the bit
- d: Do not care
For both TM4C123GXL and TM4C1294XL LaunchPads, the Port C [3:0] are used for JTAG/SWD. Therefore, when you configure Port C, you have to use bitwise operators to make sure your new configuration settings do not affect the JTAG/SWD function (PC3 ~ PC0).
Most of GPIO pins are configured as GPIOs and tri-stated by default (GPIOPCTL = 0, CPIOAFSEL = 0, GPIODIR = 0, GPIOPUR = 0, GPIOPDR = 0, GPIOODR = 0)
- Enable Clock to the GPIO Modules (RCGCGPIO register)
TM4C123G: SYSCTL->RCGCGPIO |= (_PORTs); |= binary = hex
8 4 2 1 8 4 2 1 7 6 5 4 3 2 1 0 bit Port F Port E Port D Port C Port B Port A port 0 0 -
TM4C1294: SYSCTL->RCGCGPIO |= (_PORTs); |= binary = hex
After enabling the clock signal, check the PRGPIO register until the corresponding bit is set to 1.8 4 2 1 8 4 2 1 8 4 2 1 8 4 2 1 15 14 13 12 11 10 9 8 7 6 5 4 3 2 1 0 bit Port Q Port P Port N Port M Port L Port K Port J Port H Port G Port F Port E Port D Port C Port B Port A port 0 - - -
In Assembly:
            LDR     R0, =SYSCTL_PRGPIO_R
Wait4GPIO   LDR     R1, [R0]
            TST     R1, #(__)
            BEQ     Wait4GPIO
In c:
while ( (SYSCTL->PRGPIO & ____ ) != ____ ) {}; - Unlock Port
TM4C123G: PD7 and PF0 are locked after reset.
TM4C1294: PD7 and PE7 are locked after reset
If those pins are used in the design, they must be unlocked first. To unlock the port, 0x4C4F434B must be written into the GPIOLOCK register and uncommit it by setting the GPIOCR register.
8 4 2 1 8 4 2 1 7 6 5 4 3 2 1 0 bit Port Pin 7 Pin 6 Pin 5 Pin 4 - Pin 3 Pin 2 Pin 1 Pin 0 pin Value in Hex Register Value to Register - - = ➤ GPIO ->LOCK = 0x4C4F434B - - = ➤ GPIO ->CR - - = ➤ GPIO ->LOCK = 0x4C4F434B - - = ➤ GPIO ->CR
Convert above configuration into registers
- GPIO Analog Mode Select
If any pin is used as an Analog signal (check Signal Type field on table 1), the appropriate bit in AMSEL must be set.
- 0: Digital signal
- 1: Analog signal
8 4 2 1 8 4 2 1 7 6 5 4 3 2 1 0 bit Port Pin 7 Pin 6 Pin 5 Pin 4 - Pin 3 Pin 2 Pin 1 Pin 0 pin Value in Hex Register Value to Register - - = ➤ GPIO ->AMSEL - - = ➤ GPIO ->AMSEL - - = ➤ GPIO ->AMSEL - - = ➤ GPIO ->AMSEL - - = ➤ GPIO ->AMSEL - - = ➤ GPIO ->AMSEL - - = ➤ GPIO ->AMSEL - GPIO Port Control (PCTL)
The PCTL register is used to select the specific peripheral signal for each GPIO pin when using the alternate function mode.
- 0: GPIO
- 1~0xF: Check the GPIO Pins and Alternate Function table
8421 8421 8421 8421 8421 8421 8421 8421 31~28 27~24 23~20 19~16 15~12 11~8 7~4 3~0 bit Port Pin 7 Pin 6 Pin 5 Pin 4 - Pin 3 Pin 2 Pin 1 Pin 0 pin Value in Hex Register Value to Register - - = ➤ GPIO ->PCTL - - = ➤ GPIO ->PCTL - - = ➤ GPIO ->PCTL - - = ➤ GPIO ->PCTL - - = ➤ GPIO ->PCTL - - = ➤ GPIO ->PCTL - - = ➤ GPIO ->PCTL - GPIO Alternate Function Select (AFSEL)
Setting a bit in the AFSEL register configures the corresponding GPIO pin to be controlled by PCTL peripheral function.
- 0: General I/O
- 1: Pin connected to the digital function defined in the PCTL register
8 4 2 1 8 4 2 1 7 6 5 4 3 2 1 0 bit Port Pin 7 Pin 6 Pin 5 Pin 4 - Pin 3 Pin 2 Pin 1 Pin 0 pin Value in Hex Register Value to Register - - = ➤ GPIO ->AFSEL - - = ➤ GPIO ->AFSEL - - = ➤ GPIO ->AFSEL - - = ➤ GPIO ->AFSEL - - = ➤ GPIO ->AFSEL - - = ➤ GPIO ->AFSEL - - = ➤ GPIO ->AFSEL - GPIO Pin Direction (DIR)
Set pin direction
- 0: Input pin
- 1: Output pin
8 4 2 1 8 4 2 1 7 6 5 4 3 2 1 0 bit Port Pin 7 Pin 6 Pin 5 Pin 4 - Pin 3 Pin 2 Pin 1 Pin 0 pin Value in Hex Register Value to Register - - = ➤ GPIO ->DIR - - = ➤ GPIO ->DIR - - = ➤ GPIO ->DIR - - = ➤ GPIO ->DIR - - = ➤ GPIO ->DIR - - = ➤ GPIO ->DIR - - = ➤ GPIO ->DIR - Internal Pull-Up Resistor (PUR), Pull-Down Resistor (PDR), and Open-Drain (ODR)
PUR: The pull-up control register
PDR: The pull-down control register
ODR: The open-drain control register
- 0: Disable
- 1: Enable
8 4 2 1 8 4 2 1 7 6 5 4 3 2 1 0 bit Port Pin 7 Pin 6 Pin 5 Pin 4 - Pin 3 Pin 2 Pin 1 Pin 0 pin Value in Hex Register Value to Register - - = ➤ GPIO -> - - = ➤ GPIO -> - - = ➤ GPIO -> - - = ➤ GPIO -> - - = ➤ GPIO -> - - = ➤ GPIO -> - - = ➤ GPIO -> - GPIO Digital Enable
Enables all the pins that are used in the design, including GPIO pins and alternate function pins.
- 0: Pin undriven
- 1: Enable pin
8 4 2 1 8 4 2 1 7 6 5 4 3 2 1 0 bit Port Pin 7 Pin 6 Pin 5 Pin 4 - Pin 3 Pin 2 Pin 1 Pin 0 pin Value in Hex Register Value to Register - - = ➤ GPIO ->DEN - - = ➤ GPIO ->DEN - - = ➤ GPIO ->DEN - - = ➤ GPIO ->DEN - - = ➤ GPIO ->DEN - - = ➤ GPIO ->DEN - - = ➤ GPIO ->DEN
Example Source Code
The provided sample code will serve as the foundation, but it remains incomplete. It's the participant's responsibility to finish the code following lab instructions.
EK-TM4C123GXL LaunchPad - main.c
#include <stdio.h>
#include <stdlib.h>
#include <stdint.h>
#include <stdbool.h>

#include "TM4C123GH6PM.h"
#include "MyDefines.h"

void Doorbell(void);
void RoomLightingControl(void);
void StairwallLightingControl(void);

void DelayMs(int ms);   // Software Delay Function
void Setup_GPIO(void);

int main()
{
    // Place your initialization/startup code here (e.g. Setup_GPIO() )
    Setup_GPIO();

    // Turn off LED2 here

    while (1) {
        Doorbell();
        RoomLightingControl();
        StairwallLightingControl();

        DelayMs(20);
    }
}
//------------------------------------------------------------------------------
void Doorbell()
{
    // Place your application code here

}
//------------------------------------------------------------------------------
void RoomLightingControl()
{
    // Place your application code here

}
//------------------------------------------------------------------------------
void StairwallLightingControl()
{
    // Place your application code here

}
//------------------------------------------------------------------------------
void Setup_GPIO()
{
    // Configure GPIOs
    // 1. Enable Clock to the GPIO Modules (SYSCTL->RCGCGPIO |= (_PORTs);)
    SYSCTL->RCGCGPIO |= (__);
    // allow time for clock to stabilize (SYSCTL->PRGPIO & (_PORTs))
    while ((SYSCTL->PRGPIO & (__)) != (__)) {};
    // 2. Unlock GPIO only PD7, PF0 on TM4C123G; PD7, PE7 on TM4C1294 (GPIOx->LOCK = 0x4C4F434B; and GPIOx->CR = _PINs;)
    //GPIOF->LOCK = 0x4C4F434B;   // Unlock for GPIOF
    //GPIOF->CR |= _PIN0;         // Commit for PIN0
    // 3. Set Analog Mode Select bits for each Port (GPIOx->AMSEL = _PINs; 0=digital, 1=analog)
    // 4. Set Port Control Register for each Port (GPIOx->PCTL = PMCn << _PTCL_PINn, check the PCTL table)
    // 5. Set Alternate Function Select bits for each Port (GPIOx->AFSEL = _PINs; 0=regular I/O, 1=PCTL peripheral)
    // 6. Set Output pins for each Port (Direction of the Pins: GPIOx->DIR = _PINs; 0=input, 1=output)

    // 7. Set PUR bits (internal Pull-Up Resistor), PDR (Pull-Down Resistor), ODR (Open Drain) for each Port (0: disable, 1=enable)

    // 8. Set Digital ENable register on all port.pins (GPIOx->DEN = _PINs; 0=disable, 1=enable)

}
//------------------------------------------------------------------------------
// Delay ms milliseconds (4167:50MHz TM4C123G CPU, 1605:16MHz TM4C123G CPU Clock)
void DelayMs(int ms)
{
    volatile int i, j;
    for (i = 0; i < ms; i++)
        for (j = 0; j < 4167; j++) {} // Do nothing for 1ms
}
EK-TM4C1294XL LaunchPad - main.c
#include <stdio.h>
#include <stdlib.h>
#include <stdint.h>
#include <stdbool.h>

#include "TM4C1294NCPDT.h"
#include "MyDefines.h"

void Doorbell(void);
void RoomLightingControl(void);
void StairwallLightingControl(void);

void DelayMs(int ms);   // Software Delay Function
void Setup_GPIO(void);

int main()
{
    // Place your initialization/startup code here (e.g. Setup_GPIO() )
    Setup_GPIO();

    // Turn off LED2 here

    while (1) {
        Doorbell();
        RoomLightingControl();
        StairwallLightingControl();

        DelayMs(20);
    }
}
//------------------------------------------------------------------------------
void Doorbell()
{
    // Place your application code here

}
//------------------------------------------------------------------------------
void RoomLightingControl()
{
    // Place your application code here

}
//------------------------------------------------------------------------------
void StairwallLightingControl()
{
    // Place your application code here

}
//------------------------------------------------------------------------------
void Setup_GPIO()
{
    // Configure GPIOs
    // 1. Enable Clock to the GPIO Modules (SYSCTL->RCGCGPIO |= (_PORTs);)
    SYSCTL->RCGCGPIO |= (__);
    // allow time for clock to stabilize (SYSCTL->PRGPIO & (_PORTs))
    while ((SYSCTL->PRGPIO & (__)) != (__)) {};
    // 2. Unlock GPIO only PD7, PF0 on TM4C123G; PD7, PE7 on TM4C1294 (GPIOx->LOCK = 0x4C4F434B; and GPIOx->CR = _PINs;)
    // 3. Set Analog Mode Select bits for each Port (GPIOx->AMSEL = _PINs; 0=digital, 1=analog)
    // 4. Set Port Control Register for each Port (GPIOx->PCTL = PMCn << _PTCL_PINn, check the PCTL table)
    // 5. Set Alternate Function Select bits for each Port (GPIOx->AFSEL = _PINs; 0=regular I/O, 1=PCTL peripheral)
    // 6. Set Output pins for each Port (Direction of the Pins: GPIOx->DIR = _PINs; 0=input, 1=output)

    // 7. Set PUR bits (internal Pull-Up Resistor), PDR (Pull-Down Resistor), ODR (Open Drain) for each Port (0: disable, 1=enable)

    // 8. Set Digital ENable register on all port.pins (GPIOx->DEN = _PINs; 0=disable, 1=enable)

}
//------------------------------------------------------------------------------
// Delay ms milliseconds (1605: 16MHz TM4C1294 CPU Clock)
void DelayMs(int ms)
{
    volatile int i, j;
    for (i = 0; i < ms; i++)
        for (j = 0; j < 1605; j++) {}   // // Do nothing for 1ms
}
Lab Experiments
Exp #2.1: Doorbell Control
The doorbell control circuit is very simple. When you prod the button, the circuit will be connected, and you will hear a buzzing noise. The electrical circuit for the doorbell is shown as the following Figure 3:
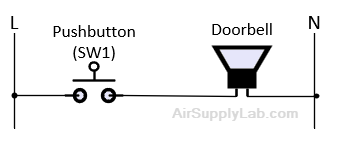
Figure 3: The Electrical Circuit for Doorbell
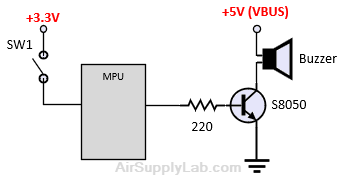
Figure 4: The Simulation Circuit for Doorbell
We use a microcontroller to implement the doorbell circuit. From Figure 3, we can easily understand that the doorbell is triggered only when a user presses the button, otherwise, the doorbell should be inactive. Then we convert the circuit behaviors to a flowchart, as shown in Figure 5.
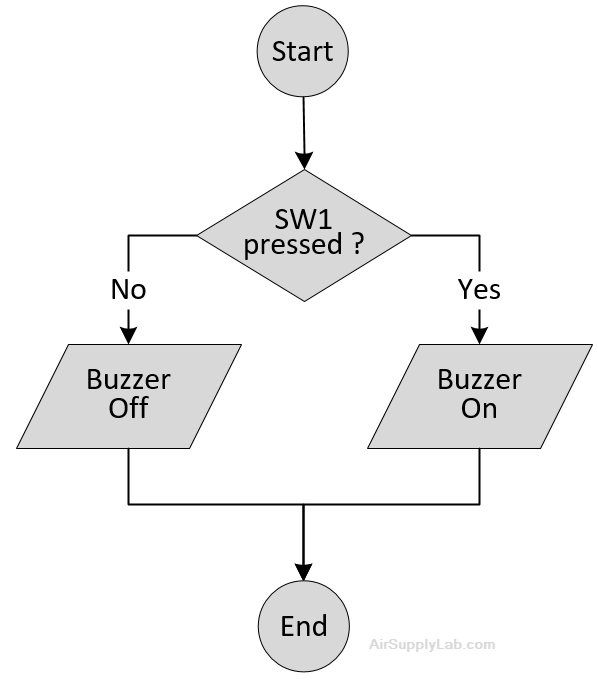
Figure 5: The Flowchart for Doorbell Controller.
Implement the flowchart in the Doorbell() function. Build and download the code to the Tiva board, and test it.
Exp #2.2: Room Lighting Control
Most rooms in a house will have one or more wall switches used to control lighting fixtures or electrical outlets. There have only three kinds of wall switches that are used to control light fixtures: simple single-pole (ON/OFF) switches, three-way switches, and four-way switches. A Single-Pole switch is one that just turns the light ON or OFF from one wall location.
Figure 6: Simple Room Light Control
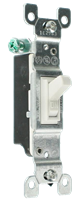
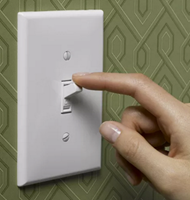
Figure 7: A Single-Pole Switch Using on Light Control
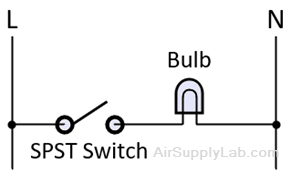
Figure 8: The Electrical Circuit for Room Light Control
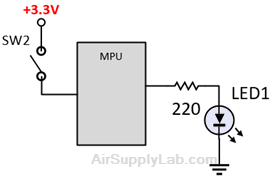
Figure 9: The Simulation Circuit for Room Light Control
A single-pole switch has two positions: OFF and ON. When you toggle the lever to the ON position, the switch gate snaps closed, which allows current to flow through the light. The switch will remain in the ON position until the lever is flipped to the OFF position, which opens the gateway up and interrupts the flow of power to the light. The electrical circuit is shown in Figure 8.
The switches we used in the circuit are momentary pushbutton switches. They are non-latching switches and change the state of the electrical circuit only while the switch is physically actuated. In other words, a momentary switch allows electricity to flow between its two contacts while the button is depressed. Upon releasing the button, the circuit is broken.
Therefore, to implement a room light controller, the microcontroller needs to retain the state of the light or switch, and when the user presses the button, it will then change the state of the light or switch. In the code, the current state needs to be saved as a variable.
You may think of using the same flowchart that was used in the previous experiment to control the light. In Figure 5, when the system detects the button pressed, it will turn on the light. The system will continue to check the state of the switch, and once the user releases the button, the system will detect that the switch is off and turn OFF the light.
However, the goal for today is to keep the light turned ON until the button is pressed again. By using the technique from previous experiment, customers will have to hold on to the button to turn ON the light, and can only release it when the light is not needed.
There are two solutions that can be used in this case:
- Finite State Machine (based on behavior state)
- Software Edge Detection (based on electrical timing)
Software Edge Detection
Software Edge Detection
Let us analyze the behavior of the system according to the timing sequence.
In the Figure 9 circuit, the SW2 is connected to the microcontroller's input pin using a positive logic input. This means that when the user presses the switch, the input pin will be connected to the power supply through the switch so that the logic value of the input pin is 1. If the user releases the switch, the switch is disconnected, the input pin will be connected to the ground through the (internal) pull-down resistor, and the logic value of the input pin becomes 0. The timing diagram for the SW2 is shown in Figure 11.
From the Moore state diagram (in Figure 10), we can observe that the output of the LED changes every time at the moment when the user presses the switch. If the user continues to hold or release the switch, the LED will not be changed. In the timing diagram, you can see that when the user presses the SW2, the logic value of the input pin is changing from 0 to 1, the edge of this change is called the rising edge. We found that the LED changes only on the falling edge of the input pin. Hence, the microcontroller just needs to detect the rising edge on the input pin, and then change the output value.
A simple if statement method is a convenient way to implement software edge detection. In the code, you have to create two local variables:
- One is a static local Boolean variable (ex. static bool preSW2) that holds the last state value. This variable is also assigned an initial value, which is the logic value of the input pin when the switch is inactive.
- Another local Boolean variable without an initial value (ex. bool curSW2) is used to save the current state of the input pin.
The following steps show how to detect the falling edge:
- Read the current state value of the input pin that connects to the SW2, and save that value to the curSW2 variable.
- Check previous and current state variables:
If the previous state preSW2 is logic 0 (which means the SW2 has been released before) and the current state curSW2 is logic 1 (just pressing the SW2), it means that a rising edge occurred on the pin that connected to the SW2, and then changes the LED state - Stores the current state value to the previous state variable (preSW2 = curSW2).
Comment out all the previous code in the RoomLightingControl() function and implement the software edge detection (simple if statement method). Build and download the code to the Tiva board, then shows the result to the instructor.
Exp #2.3: Stairwell Lighting Control
Next, implement a control switch that is often used in stairwells as shown in Figure 12.
Figure 12: The Light Control System at the Stairwells
The stairwell lights are controlled by switches that are installed on each floor. When you want to go up/down the stairs, just press the switch to turn on the lights on the wall. After reaching the target floor, simply press the switch on the current floor to turn off the lights.
Now, you have to design a system to support the stairwell light. Two switches control one LED, which means you can turn on the LED on one of the switches and also can use one switch to turn off the LED. The code should be similar to the previous experiment, but add one more switch to toggle the LED.
After resetting, the LED2 should be turned off. If your LED2 is on, you have to turn it off after calling Setup_GPIO() function before entering the infinite while-loop.
Software Edge Detection on Both Switches
You can use the toggle function with edge detection to control the light. The pseudocode is as follows:
Using Software Edge Detection
read the current states for SW3 and SW4
if a falling edge occurs on SW3
toggle LED2
endif
if a falling edge occurs on SW4
toggle LED2
endif
update the previous states from the current states for SW3 and SW4